SAP Interface Secure Network Communications (SNC)
It is advised to enable SNC for the most secure way of communicating between the Ometa server and the SAP system. If your SAP system has SNC enabled, additional configuration is required before the Ometa SAP interface can communicate with it. In this article, we'll guide you through the steps to configure SNC for the Ometa SAP interface.
Setup SNC library directory
First of all we need a directory to work in on the Ometa framework server. This directory will eventually contain our cryptographic library & tools and certificates which are required to securely communicate with the SAP server.
In this guide, we create C:\SAP\SNC as example directory but any directory will suffice.
SECUDIR environment variable
The SNC library directory we just created must be known via the environment of the system. Create a new system environment variable called SECUDIR and give it the value of this directory.

Cryptographic tools & library
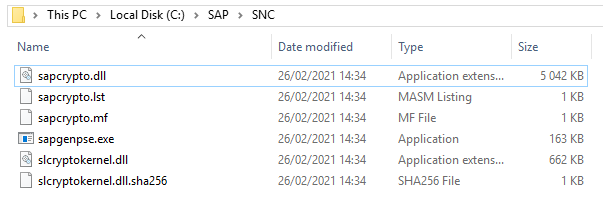
The SAP cryptographic tools & library must be present in the SNC library directory. You can find all required files in a subdirectory of the installed SAP interface (default: %OMETA_INSTALL_ROOT%\Ometa Software Suite\TopDir\BC\Bin\Interfaces\BCS_SAP\References [x64/x86]\SNC).
Note
Take note of the x64/x86 in the path name. If the SAP interface is installed on a 64-bit environment, copy the files of the x64 folder. If not, take those of the x86 folder.
Your SNC library directory should now look like this.
Note
It is possible that your SAP system requires another version of the cryptographic library. If you have one, feel free to replace the one in this directory if that is the case. If your own library has another name, remember to change any SNC Library Path variables of the SAP profiles in the Ometa Business Connector.
Create an SNC Personal Security Environment (PSE)
The Ometa framework server must have a Personal Security Environment or PSE and an associated certificate to be imported in the SAP Application server for establishing SNC connections. You need to create and use the SAP specific PSE that is generated from the sapgenpse tool in our SNC library directory. Using the generated PSE you can either create a self-signed certificate or may obtain a certificate from a trusted Certification Authority (CA). The scope of this guide is limited to explaining how to create a self-signed certificate.
Generate PSE file
In the SNC library directory, execute the following command to generate a PSE file. Take note of the following command switches:
- -p pse_filename: the name of the generated PSE file.
- -x password: the password of the PSE file. You will need this in other steps of this guide.
- DN: the distinguished name for the PSE. You are free to fill this in yourself for self-signed certificates.
sapgenpse get_pse -p ometa_framework.pse -x my_password "CN=ometa-server.company.net, OU=SAP, O=OMETA, C=BE"
As a result, you'll now have a file named ometa_framework.pse in the SNC library directory.

Link the PSE file with the OS user
We need to link the user, who is going to execute our SAP interface, with this newly generated PSE file. This user is the one running the BCS_SAP.exe processes. Those processes are started by the Ometa Business Connector Slave Listener service (BCSL). Check which user is configured on the BCSL service and use that one for linking to our PSE file.
Take note of the following command switches:
- -p pse_filename: the name of the generated PSE file.
- -x password: the password of the PSE file used when you generated it.
- -O os_user: the OS user to link with the generated PSE file (the one configured on the BCSL service).
sapgenpse seclogin -p ometa_framework.pse -x my_password -O OMETA\svc_frameworkdev
As a result, you'll now have a file named cred_v2 in the SNC library directory.

Important
If you ever chance the user account of the BCSL service, you'll need to re-execute this step or you will not be able to execute the SAP interface.
Export PSE Certificate and Import in SAP
Our SAP system needs to import a certificate of our newly created PSE. To be able to do this, we first need to export it in the SNC library directory.
Export PSE Certificate
Open up a command prompt and navigate to the SNC library directory (in our example C:\SAP\SNC). Execute the following command. Take note of the following command switches:
- -o exported_certificate_name: the name to give to the exported certificate.
- -p pse_filename: the name of the PSE file.
- -x password: the password of the PSE file used when you generated it.
sapgenpse export_own_cert -o ometa_framework_certificate.crt -p ometa_framework.pse -x my_password

Note
You'll need this exported certificate file on the system where you open up your SAP GUI. If this is not the same server, please copy the file to the server where you will be starting the SAP GUI.
Import Certificate in SAP
Now we need to import our exported certificate in the SAP system.
- Open up SAP and go to the transaction STRUST
- Go to SNC (SAPCryptoLib)
- Click Import certificate
- Select the exported certificate file on the file system and confirm
- Ensure you are in edit mode and click Add to Certificate List
- Save your changes

Export SAP Certificate and Import on Ometa server
Our Ometa system needs to import the SAP SNC certificate. To be able to do this, we first need to export it in the SAP system.
Export SAP SNC Certificate
- Open up SAP and go to the transaction STRUST
- Go to SNC (SAPCryptoLib)
- Double-click on the Subject of the Own Certificate section. This will load its details in the Certificate section below
- Click on Export certificate
- In the popup, choose Base64 as the file format and fill in the path & filename you want to use for the exported certificate.
- Confirm the export

Import SAP SNC Certificate on Ometa server
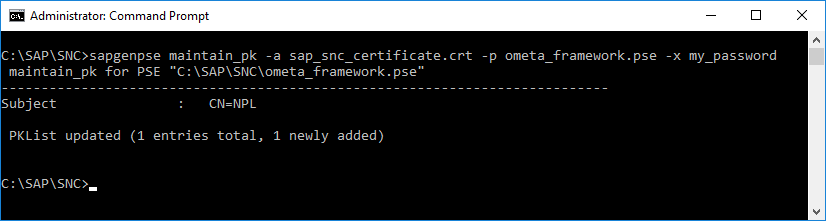
Ensure that the exported SAP SNC certificate exists on the Ometa server in our SNC library directory (in our example C:\SAP\SNC). Open up a command prompt and navigate to the SNC library directory. Execute the following command. Take note of the following command switches:
- -a exported_certificate_name: the filename of the exported SAP certificate.
- -p pse_filename: the name of our PSE file.
- -x password: the password of the PSE file used when you generated it.
sapgenpse maintain_pk -a sap_snc_certificate.crt -p ometa_framework.pse -x my_password
Configure SAP User
The final step is to enable the PSE certificate on the SAP user(s) which is/are going to be used in the Ometa server. Open up SAP and go to the transaction SU01. For each SAP user, which is going to be used on the Ometa server, follow these steps:
- Open up the SAP user in edit mode
- Click on the SNC tab
- Fill in the Distinguished Name (DN) of our PSE certificate prefixed with p:
- Save your changes
Note
It is possible that SAP doesn't show the 'p:' after saving. If Canonical name determined has a green check, you're good to go.

That's all. You can now alter the SAP profile in the Ometa Business Connector and enable SNC for the SAP interface.