The Print feature allows you to export the current data grid (table) to a printer or a PDF file. Before printing, you have full control over which columns are included, how the table is scaled to fit the page, and whether the document should be formatted in Portrait or Landscape mode.
How to use the Print feature
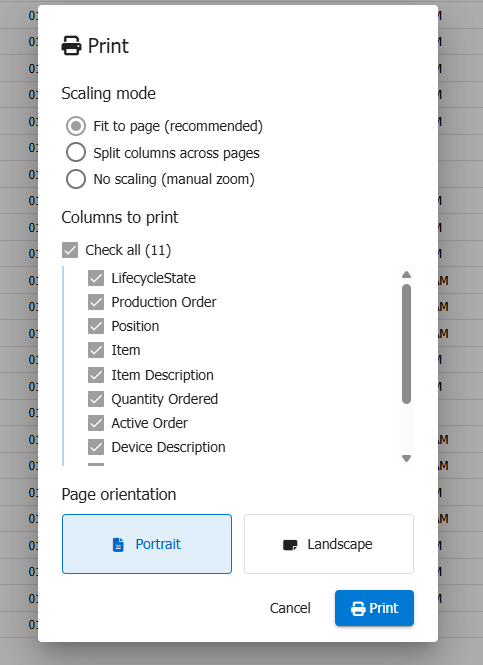
Locate the Print Button: Navigate to the list or grid view containing the data you wish to print. Click the Print button located in the toolbar above the grid.

Configure Print Options: A dialog window will appear titled Print Orientation. Here you can customize your printout:
- Scaling Mode: Choose how the table should be fitted to the page (see Scaling Modes below).
- Select Columns: By default, all visible columns are selected. Check the boxes next to the column names you want to appear on the paper.
- Select/Deselect All: Use the checkbox at the very top (e.g., Check all (8)) to quickly select or deselect all available columns.
Choose Orientation & Print: Once you have configured your options, choose your preferred paper layout to start printing. Note: Clicking one of these buttons will immediately trigger the browser's print preview window.
- Portrait: Best for tables with fewer columns. Prints vertically.
- Landscape: Best for tables with many columns. Prints horizontally.
To close the window without printing, click Cancel.
Note
Expand templates are not included in the printout because only one can be open at a time, which would make printed results inconsistent.
Scaling Modes
The scaling mode determines how the system handles tables that are wider than the printable area of the page. You can choose from three modes in the print dialog:
Fit to Page (Recommended)
The default mode. The entire table is automatically scaled down to fit the page width. This ensures that all selected columns are visible on a single page without any columns being cut off or split.
- Best for most use cases.
- All columns remain on one page.
- Text size is reduced proportionally — very wide tables may result in smaller text.
Split Columns Across Pages
If the selected columns are too wide for a single page, the system splits the table into multiple sub-tables, each printed on a separate page.
- Each sub-table fills the full page width for maximum readability.
- Row heights are synchronized across all pages, so pages can be placed side-by-side with perfectly aligned rows.
- Grouping headers are repeated on every page.
- Table headers are repeated at the top of every printed page.
No Scaling (Manual Zoom)
The table is printed as-is without any automatic scaling or splitting. Use this mode if you prefer to control the zoom level manually in the browser's print dialog.
Browser Print Settings
After selecting Portrait or Landscape in the application, your browser's system print dialog will open.
Ensure the Destination is set to your physical printer or "Save as PDF".
Verify that the orientation in the browser settings matches the option you selected in the application (Portrait or Landscape).
Adjust Margins as needed — the table automatically adapts to the available space regardless of your margin setting (None, Default, Minimum, or Custom).
Tip
Rows are never split across page boundaries. If a row does not fit at the bottom of a page, it will automatically move to the next page.
FAQ
Q: Can I print the full data set?
A: No. Printing only includes the records currently shown on the page. By default, the Multi Record View shows 25 items per page, but this page size is configurable. For example, if the underlying data set has 100 records, the print will include only the 25 visible records unless you change the page size or navigate through pages.
Q: Why are some columns missing from my printout?
A: Please check the Print Orientation dialog before printing. Ensure that the checkboxes for those specific columns are ticked.
Q: Can I print hidden rows?
A: No, the print feature respects the current view. Collapsed or filtered-out rows will not be printed.
Q: How do I include more records in one printout?
A: Increase the page size in the Multi Record View configuration or use paging to navigate and print each page separately.
Q: The text is too small when using "Fit to Page" — what can I do?
A: If you have many columns, the table may be scaled down significantly. Consider deselecting some columns, switching to Landscape mode, or using the "Split Columns Across Pages" mode instead.
Q: I want to use "Split Columns" and place the pages side by side — will the rows align?
A: Yes. Row heights are measured from the original table and enforced on every sub-table, so all pages will have identical row heights that align perfectly when placed next to each other.
Q: Why do I see grouping headers repeated on every page in "Split Columns" mode?
A: This is by design. Grouping headers are preserved on every page so that the context of grouped data is always visible, regardless of which page you are looking at.
Q: How do margins work?
A: The print system respects your browser's margin settings. Changing margins in the browser print dialog (None, Default, Minimum, Custom) will adjust the available space, and the table will automatically adapt to fill