OData Wizard
This section will include a tutorial on how to use the OData Wizard to generate objects.
Starting The Wizard
This section will show you how to start the wizard.

The wizard can be launched by clicking the dropdown mark of the New Object button in the business connector. The business connector prompts for a profile when you click on the 'OData Wizard' button.

Warning
Make sure that a valid service url is provided in this profile.
Creating An Object
Once the profile has been specified, the wizard will pop up. On the first page of the wizard, you will be able to select the entity set to create an object for. You can create multiple objects at once.

Once you've selected the entity set another section of the window becomes visible. The wizard will show you the entity set fields that are fetched from the entity set you've selected.

Selecting The Fields
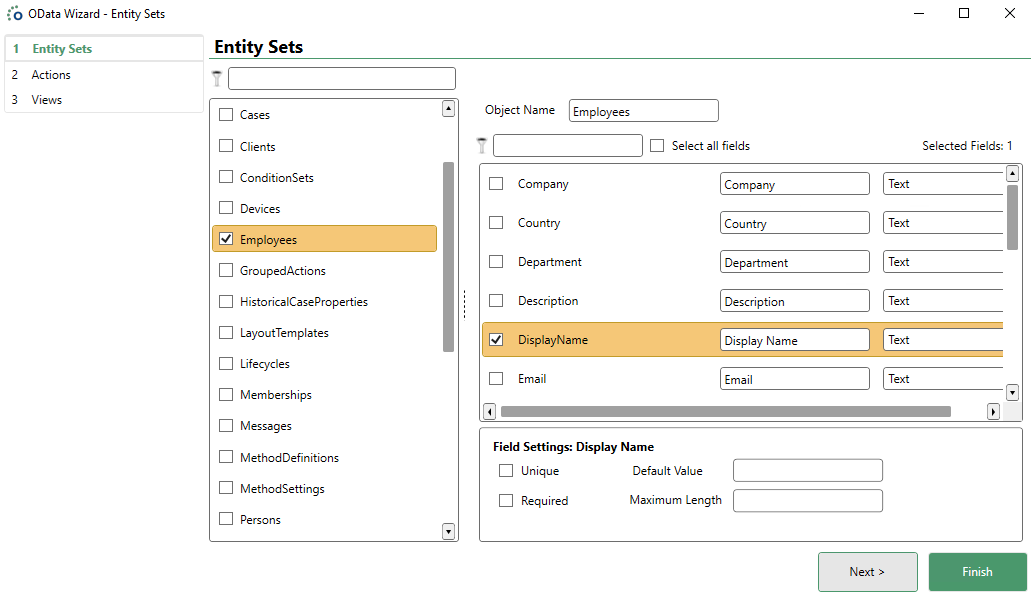
You can select an entity set field if you want to use this field on the object you are going to create. Once you select a field, extra settings will become configurable. By default, these settings will use the configuration from the EDM model.
| Extra Setting | Description |
|---|---|
| Unique | Indicates if the object field is the primary key of the structure. |
| Required | Indicates that the object needs to be filled with data, in other words it cannot be null. |
| Default Value | Specify what the default value of that field should be. |
| Maximum Length | Specify what the maximum length of the data in the field should be. |
Once you configured the object with the object fields in the wizard, you can click the 'Next' button to go to the Actions part of the Wizard. You can also click the 'Finish' button to create a blank object with some fields. The existing objects will be reloaded and the new one will be selected automatically.
Note
It is still possible to change the object and its properties and fields after its creation in the Business Connector, like any other object.
Creating Actions
This part of the documentation will show you how to create actions for the entity set and fields that were selected in the previous part of the OData Wizard.
The screenshot below represents the initial screen of the second page of the wizard. It's possible to configure one or more actions to be created on the object selected in the first page of the wizard.

| Action | Description |
|---|---|
| Create | The Create action will make an insert method to make a new record in the database. |
| Update | The Update action will make an update method to update a certain record from the database. |
| Single Get | The Single Get action will make a method to fetch one specific record from the database. |
| Multi Get | The Multi Get action is very similar to the Single Get action. This action will create a method that fetches multiple records from the database. |
| Delete | The Delete action will make a method that is used to delete one specific record from the database. |
| Context Manager | A context manager. |
Action Settings And Fields
After selecting an action to be created it's possible to configure the settings of that action.
The fields selected in the previous page of the wizard can now be configured as input or output fields for the action. These will be used to generate the interface script.

It is possible to finish the wizard after configuring the actions by clicking on the 'Finish' button, but it is also possible to add some views first by clicking on the 'Next' button.
Creating Views
This part of the documentation will show you how to create actions for the entity set and fields that were selected in the previous parts of the OData Wizard.

View Settings And fields
When selecting a view to be created, the general settings and the settings for the layout of the view will become visible. The values found in those settings are automatically generated but can be modified.
The fields of the checked actions will be available to be configured as view fields on the view that corresponds with that checked action.

When the user configured the views on the object and clicks 'Finish' the object will be created in the Business Connector.