Installing Ometa Web Parts in SharePoint Online
This guide describes the procedure to perform a clean installation of the Ometa Framework SharePoint Web Parts (ADM, Smart Tiles, Gantt, etc.) in a SharePoint Online environment.
Note
This guide is for a first-time installation. If you already have Ometa Web Parts installed and need to update them, please refer to the Upgrade Guide.
Trusted Script Source
Refer to the minimum system requirements to apply the trusted script source.
Prerequisites
- Permissions: You must have SharePoint Administrator permissions or be a Site Collection Administrator of the App Catalog site.
- Requirements: Ensure your environment meets the minimum requirements.
- Package: Have the
obiz-suite-apps.sppkgfile ready (found in the Ometa Framework installation package).
Step 1: Determine Deployment Scope
In SharePoint Online, you can deploy the app globally or locally. Choose the strategy that fits your needs:
- Global Deployment (Tenant App Catalog): The app is available to all site collections in your organization. This is the standard for Production environments.
- Local Deployment (Site Collection App Catalog): The app is only available in one specific site collection. This is ideal for testing or isolated environments.
(If you need a Site Collection App Catalog, refer to the Microsoft documentation to create one using PowerShell).
Step 2: Navigate to the App Catalog
Go to your SharePoint Admin Center.
Expand More features in the left menu.
Click on Apps.
Click on App Catalog (this will open the Tenant App Catalog). (If you are using a Site Collection App Catalog, navigate directly to that site's "Apps for SharePoint" library).
Select Apps for SharePoint from the left-hand navigation.
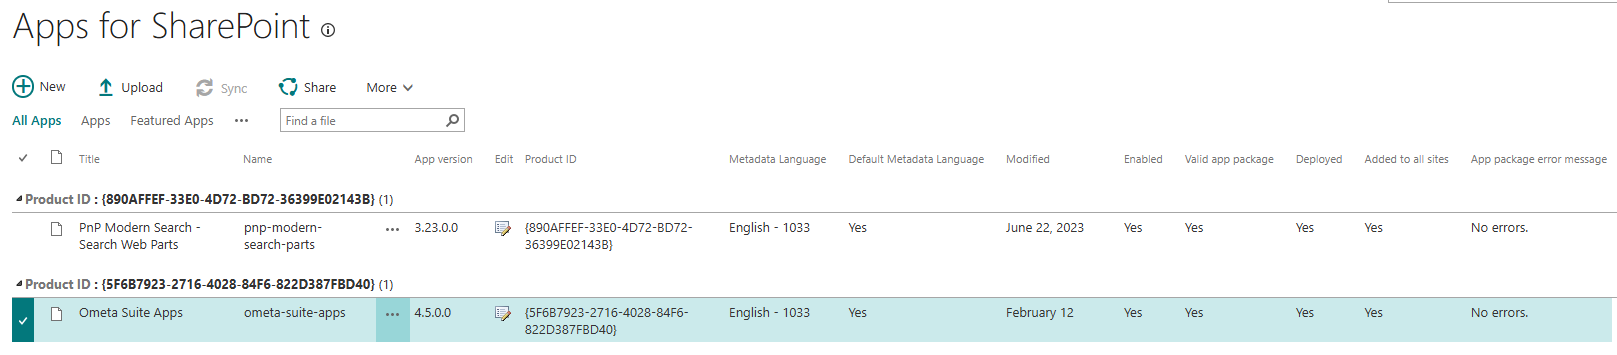
Step 3: Upload the Package
- Drag and drop the
obiz-suite-apps.sppkgfile from your computer into the list. (Alternatively, use the Upload button in the command bar).
Step 4: Deploy and Trust
Once the upload finishes, a deployment dialog will appear automatically.
Make available to all sites: Check the box "Make this solution available to all sites in the organization".
- Checking this allows the web parts to be used immediately on all sites without manually adding the "App" to each individual site. It also places the web part in the "Shared" category of the web part picker.
Click Deploy.
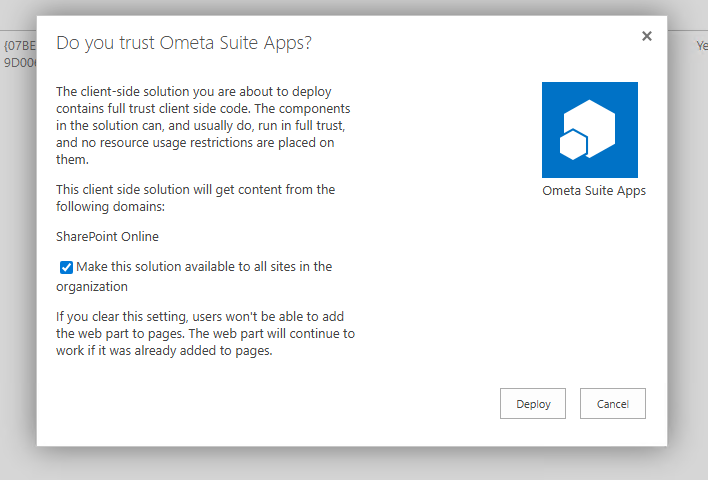
Step 5: Verify Availability
To ensure the installation was successful, verify that the web parts are available on a site.
- Navigate to any modern SharePoint Page.
- Click Edit.
- Click the + icon to add a new web part.
- Search for "ADM".
- You should see the Ometa components (e.g., ADM, Smart Tiles) available for selection.
Troubleshooting: "App not appearing?"
If the web parts do not appear in the picker:
- Ensure the app was deployed without errors in the App Catalog (check the "App Package Error Message" column).
- If you did not check "Make available to all sites", you must first add the app to the site:
- Go to Site Contents > New > App.
- Select the Ometa App from the "From Your Organization" section to install it on that specific site.