Using App-Only Authentication
SharePoint Office 365 allows client applications to connect using an username and a password. An Ometa profile contains these two fields to be able to execute the building blocks. This way of authenticating in code has been made lagacy by Microsoft in favor of App-Only Authentication.
Legacy authentication is enabled by default on a tenant, but this could be removed in the future. This article describes the steps you can take to start using the App-Only authentication now.
Tip
You can review this setting by running the Get-SPOTenant command in the SharePoint Online Management Shell and checking the LegacyAuthProtocolsEnabled property in the output.
Registering the Application on SharePoint and Granting Permissions
A few steps are needed to configure App-Only authentication for the building blocks. You'll need to register an application in the Azure portal of Microsoft and grant SharePoint permissions to this application.
Warning
In the following steps, you will be adding an application to Azure. Don't do this under your personal account, but use an account of your organisation in Azure.
Register the Building Blocks as an Application
Note
This step is only needed if we didn't register an application for the framework yet. When using the Microsoft provider for authenticating users in the Ometa Framework, an app should already be registered. You can skip this step if an application registration is already present.
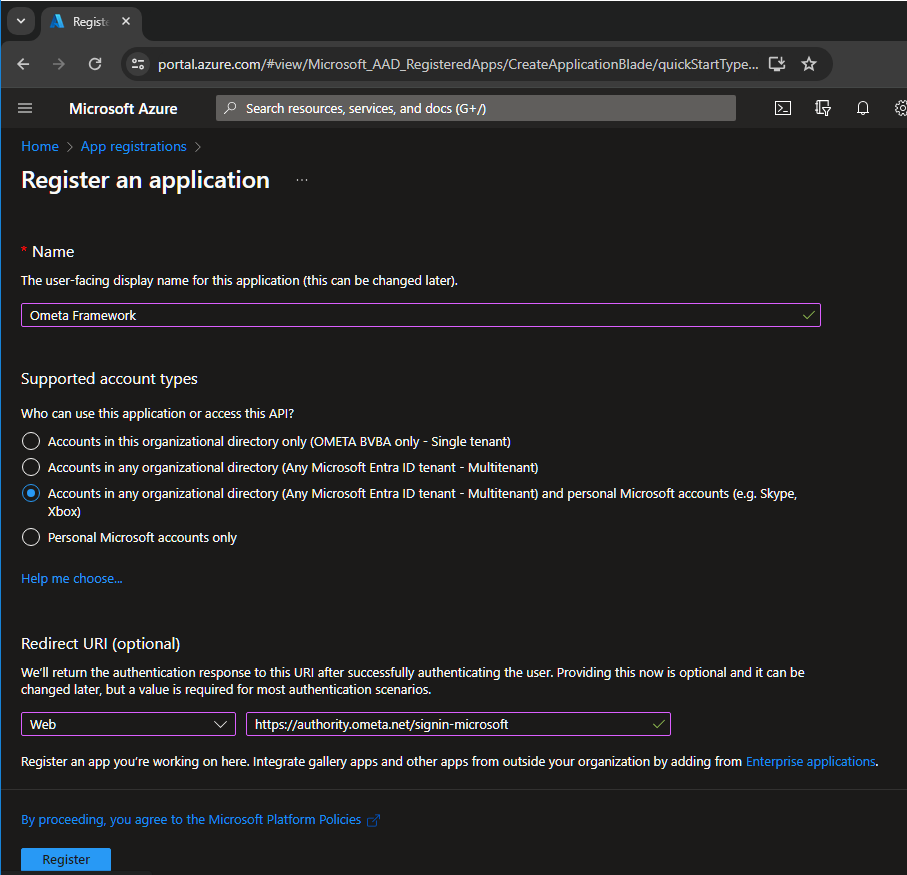
- Login to the Microsoft Azure Portal, navigate to the App Registrations and click on New registration.
- Fill-in the display name which you want to use for the Building Blocks.
- Choose which account types will be logging in via this application. When using only the Building Blocks, accounts in the organizational directory only will be enough.
- Click on Register.
Create a Secret or use a Certificate
The application has now been registered. The Authority Service needs a secret to prove to Azure that it is this service that's requesting a token for the authenticating user. This is an extra security check together with a valid redirect uri. You can use a certificate, or use a secret.
- Click on the Certificates & secrets in the navigation tree on the left of the application registration.
Secret
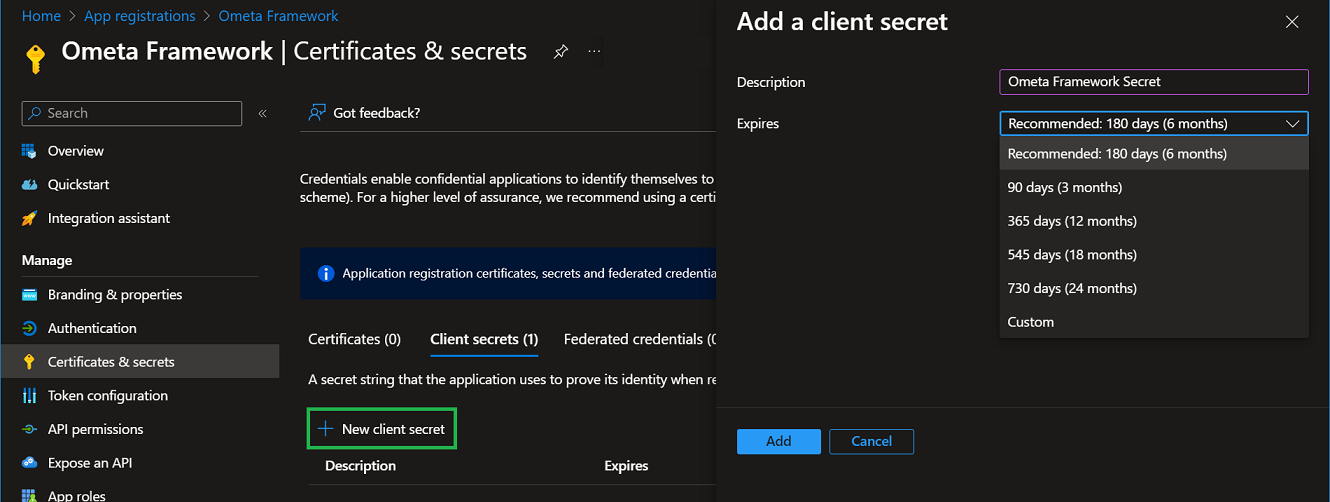
- Click on the New client secret button.
- Fill-in a description and choose when the secret will expire. Remember to generate a new secret and update the secret on all places where used in the Ometa Framework.
- Click on Add.
- Create a task in your Outlook Agenda to generate a new secret a week before the expiration date!
Caution
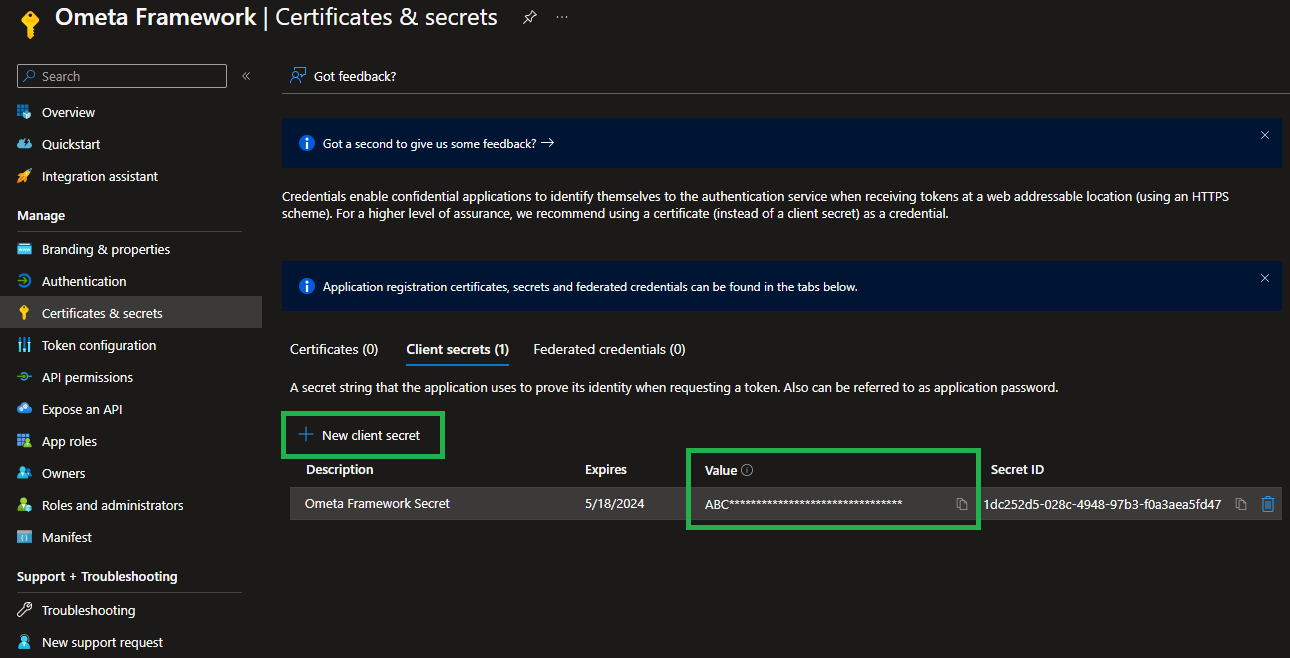
Your secret has now been generated. Don't forget to copy the value of the secret because you won't be able to retrieve it after you leave the page or do a refresh!
You'll need the secret later (together with the application ID which you can find on the overview of the app) when configuring the providers in the Ometa Framework itself.
Threat this secret as a password and store it only in a password manager.
Certificate
It is also possible to add a certificate to the application instead of a secret. There are two options here:
- You install the certificate on the machine where the Ometa framework is running.
- You store the certificate in the Azure Key Vault.
1 - Local Machine
Make sure the certificate is installed on the local machine. Click on the 'Upload certificate' button and select the certificate.

The last thing we need to do is to fill in the required fields in the Building Block profile, and in the 'appsettings.json' file of the generic REST service. The following fields are required:
- Client ID
- SharePointOnlineAzureADCertificate
- SharePointOnlineTenant

In the 'appsettings.json' file of the generic REST service, it will look as follows:
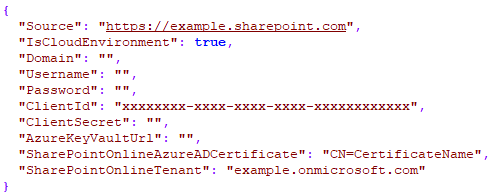
You're now able to execute BB's and loading ADM's on SharePoint, if the app has the permission to access SharePoint.
2 - Azure Key Vault
It's also possible to store the certificate in the Azure Key Vault. Import your certificate:
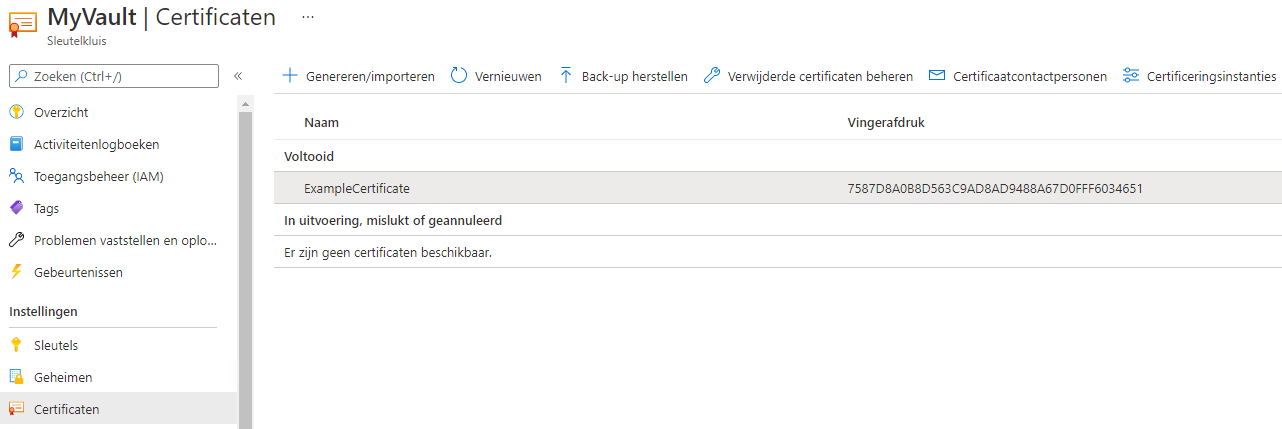
You should also upload the certificate to the app.

Next, you should give your app access rights on your vault. Navigate to the 'Access Policy' page and add a policy:
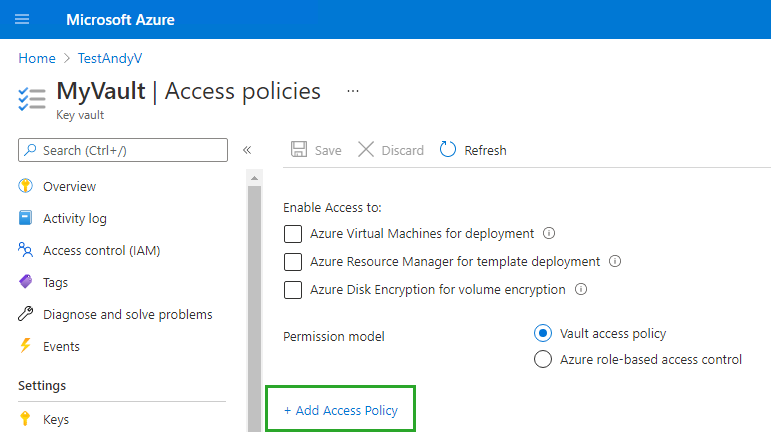
Select your app as a principal and configure the other options like this:
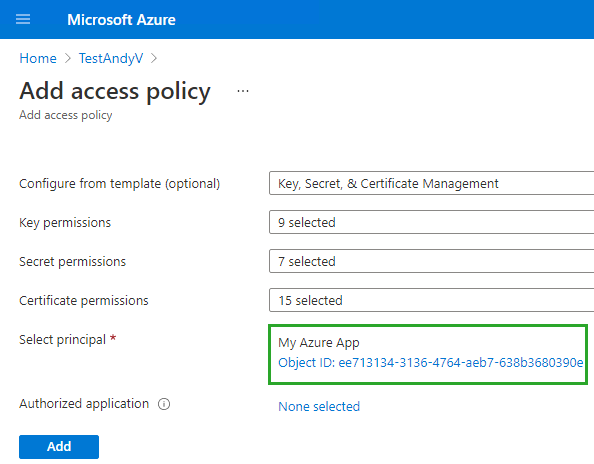
Your app is now able to access the key vault.
The last thing we need to do is to fill in the required fields in the Building Block profile, and in the 'appsettings.json' file of the generic REST service. The following fields are required:
- Client ID
- Client Secret
- Azure Key Vault Url (https://<VAULT_NAME>.vault.azure.net)
- SharePointOnlineAzureADCertificate
- SharePointOnlineTenant

In the 'appsettings.json' file of the generic REST service, it will look as follows:
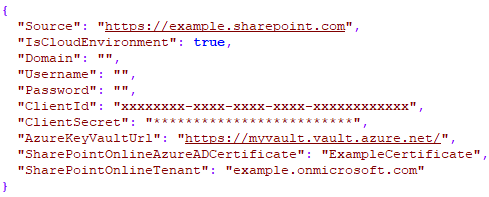
You're now able to execute BB's and loading ADM's on SharePoint, if the app has the permission to access SharePoint.
Granting Access to SharePoint
By default no SharePoint permissions are set on the application we registered.
To be able to execute actions to SharePoint with the building blocks like creating lists, sites,... we need to add tenant scoped or site specific permissions.
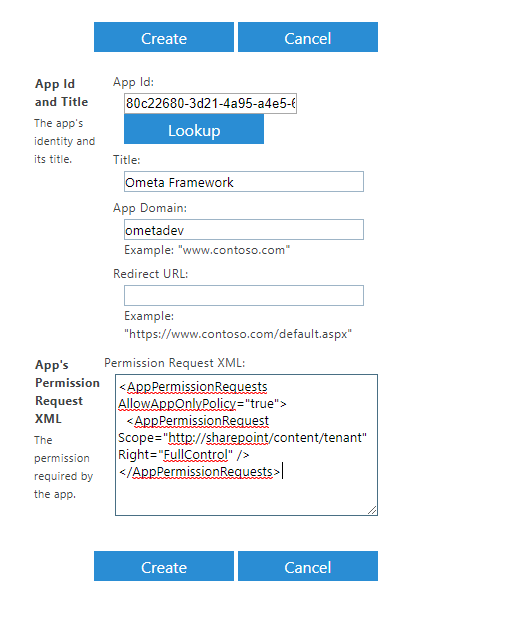
- Add /_layouts/15/appinv.aspx at the end of the tenant URL or site URL, for example: https://[yourtenant]-admin.sharepoint.com/_layouts/15/appinv.aspx.
- Once the page is loaded an App Id should be given. This can be found in the Microsoft Azure Portal under Overview. Copy the Application (client) ID and paste it in the field.
- Click on Lookup. The title of the application should be automatically filled in.
- Fill in the App Domain. For this application this doesn't matter, but it is required to complete the form.
- Leave the Redirect URL empty.
Fill in the following XML in the App's Permission Request XML, the URL of the scope MUST NOT be changed.
Full control permission for a whole tenant (when accessing the page from the admin tenant):
<AppPermissionRequests AllowAppOnlyPolicy="true">
  <AppPermissionRequest Scope="http://sharepoint/content/tenant" Right="FullControl" />
</AppPermissionRequests>
Full control permission for a specific site collection (when accessing the page from a site):
<AppPermissionRequests AllowAppOnlyPolicy="true">
  <AppPermissionRequest Scope="http://sharepoint/content/sitecollection" Right="FullControl" />
</AppPermissionRequests>
Click on Create.
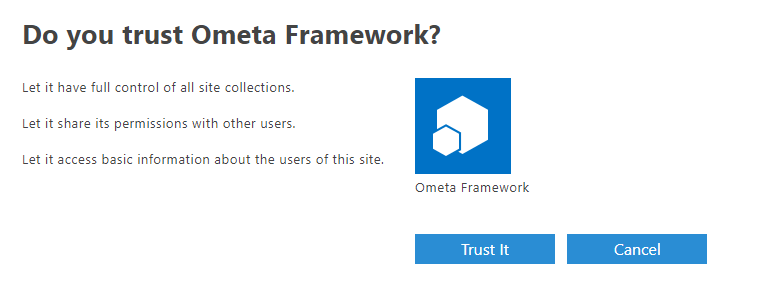
A confirmation message is shown, click on Trust It to grant permissions.
Filling in the Building Blocks Profile
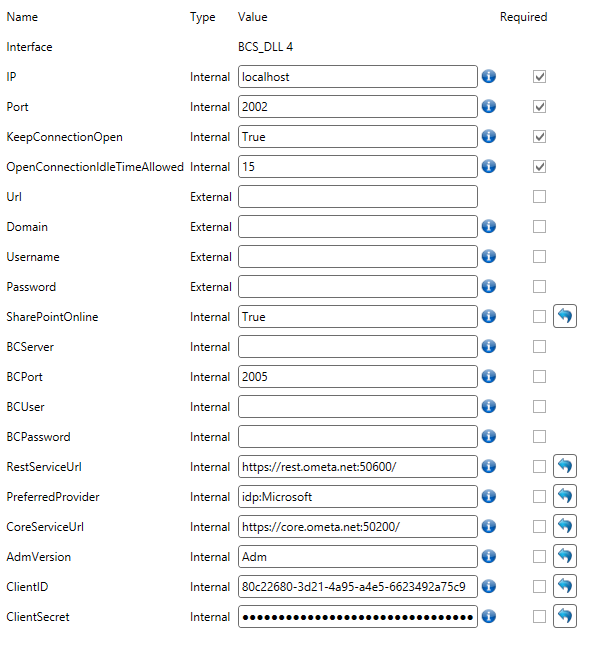
To use App-Only authentication in the building blocks we need to change the profile. Fill in the ClientID and ClientSecret of the application. The client ID is the ID we set in App Id field when setting the permission. The client secret is the secret we generated earlier.
The Domain and Password fields can be left empty. They are ignored when ClientID and ClientSecret are set. The Username field can only be left empty if you don't use this profile for site creation.
Warning
If you use this profile for site creation, an owner account must exist in the form of an email address. If the Trigger Case Management setting on the method doesn't contain a custom owner, you need to provide an owner's email address in the Username field of this profile. Otherwise site creation will fail.
