OPC UA Wizard Guide
The goal of the wizard is to allow quick and easy creation of OPC UA methods. This guide will provide an example use case and goes through the steps. This guide expects that an OPC UA profile is configured and ready to be used.
For demonstration purposes, we have set up a simple OPC UA server with a few sensors.
Starting up the Wizard
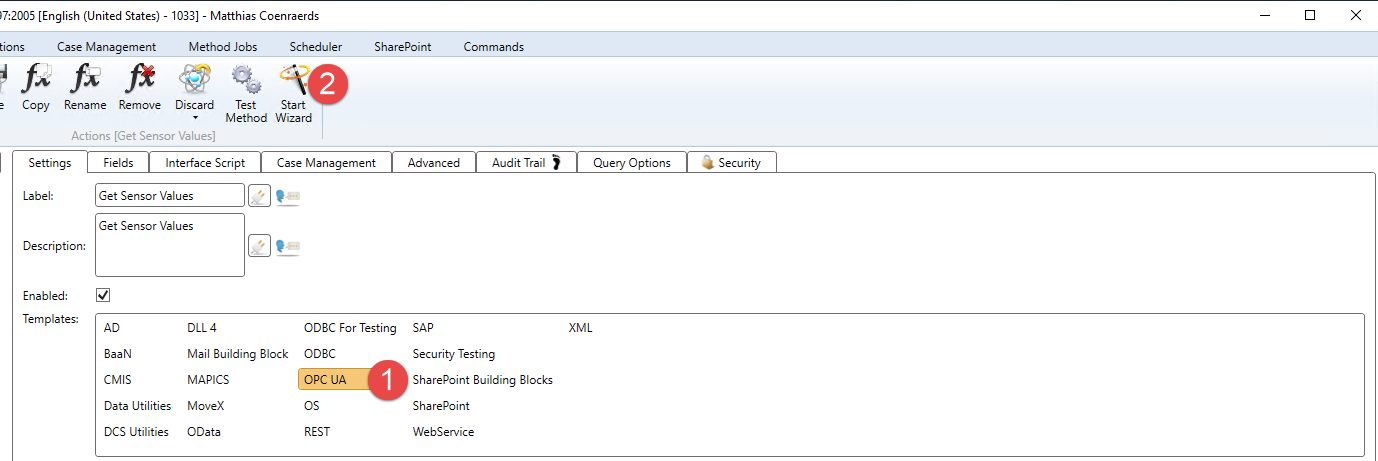
To start the OPC UA wizard, create a method within the Ometa Business Connector with the OPC UA template selected. And click the start wizard button in the ribbon.
Tip
If the OPC UA template is not visible, run the installer and make sure to select the OPC UA interface.
Select the OPC UA profile you want to use and the wizard will open.
Reading Values from Sensor Instances
This part of the guide configures the method to retrieve values from 3 sensors.
After starting the wizard, select the Read option. Since we are going to select which devices to use specifically, use the instances option.
Tip
If you want to read all sensors of one type at once, refer to the Reading Values From All Sensors Of A Type section.
The wizard then browses to the Objects folder within the base OPC UA structure.
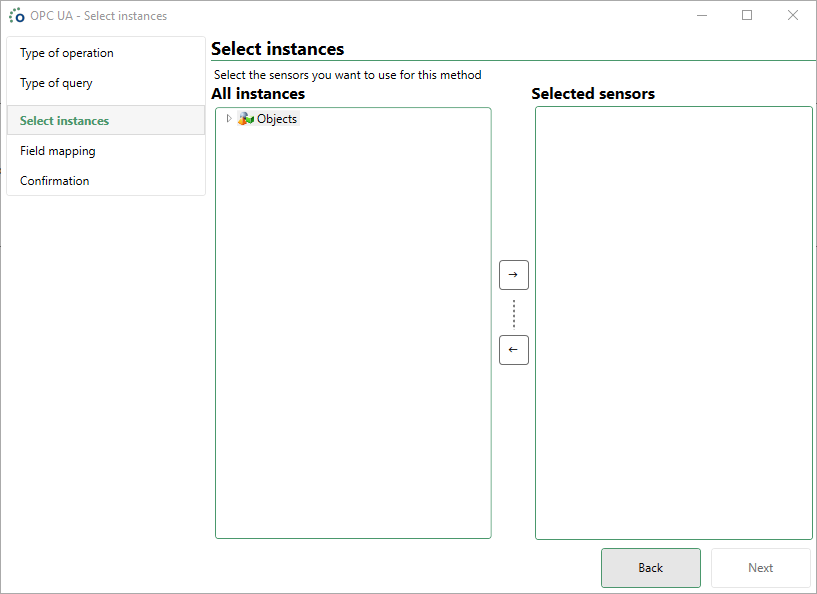
Browse to the instances you want to select by double clicking an object or expanding the item.
Use right click and add or the right arrow on a node to add it to the selected sensors. The browse path to the selected sensors is shown on the right side of the window.
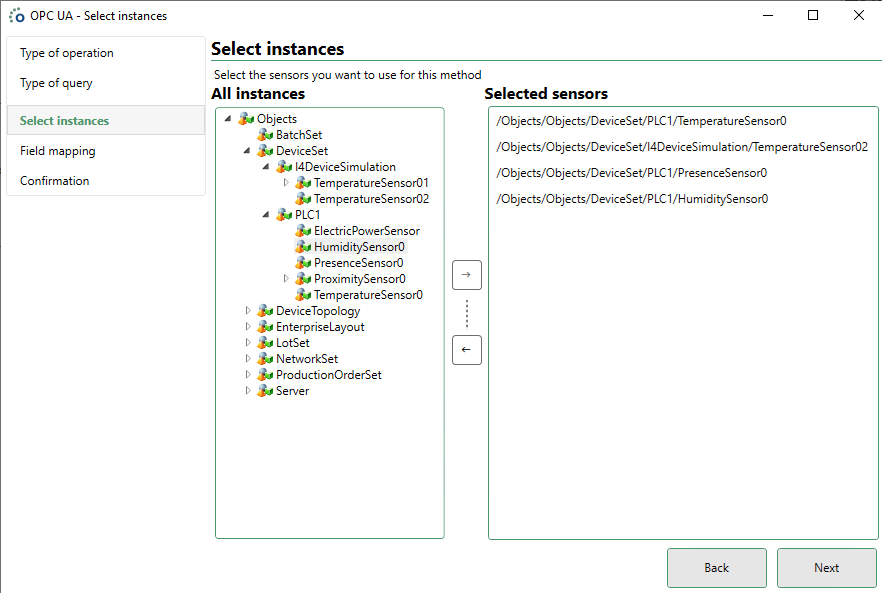
Click next after selecting all desired devices to proceed. Refer to Fieldmapping for more information on how to continue.
Reading Values from All Sensors of a Type
While selecting individual devices may be practical for a test environment, it is not maintainable on a large scale. This part of the guide allows selecting many instances at once, based on a type of device and root folder(s).
Start the wizard and select the Read and Types options.
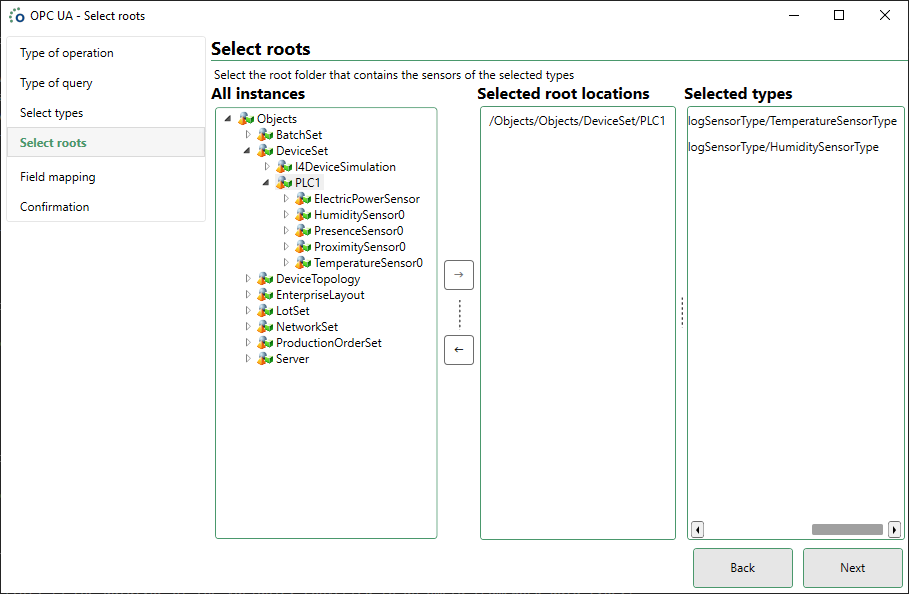
Browse and select the types you want to use. In this example, I want to read the values of all devices of the types TemperatureSensor and HumiditySensor. The browse path to the selected types is shown on the right side of the window.
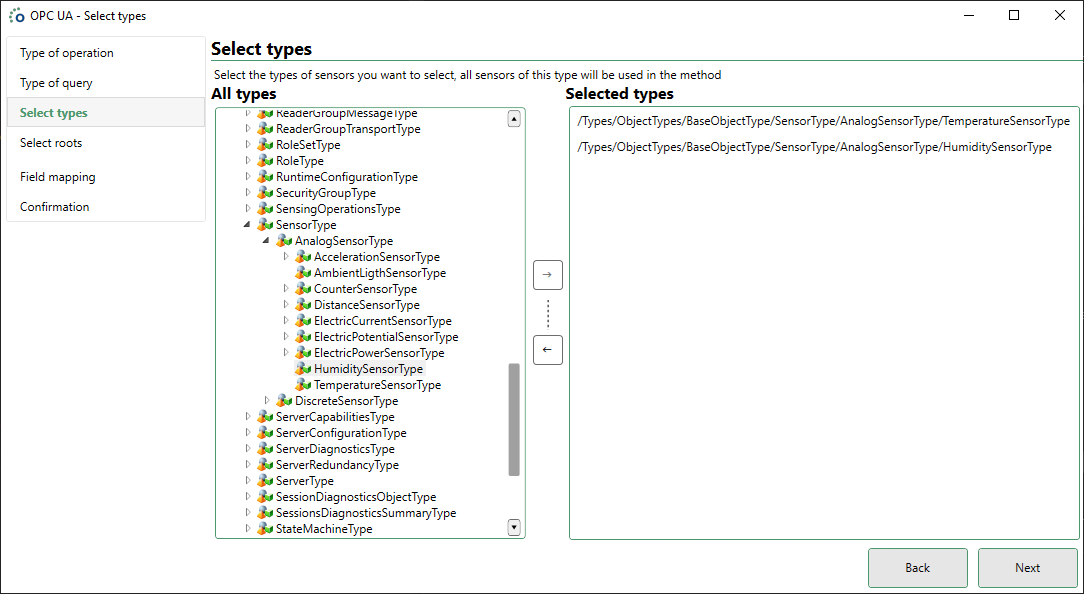
Click next to proceed selecting the root locations.
Caution
The current implementation of the OPC UA connector is not handling inheritance of types. Therefore, to select different types which have a common root type, you'll need to select each (sub)type separately in the Types tree.
Selecting Root Folders
In order to have some control over which sensors are selected, the OPC UA interface allows selecting only the instances of a type within a folder.
Tip
No root folder needs to be configured if all possible devices should be queried.
Example with the following structure:
- Objects
- DeviceSet
- PLC1
- HumiditySensor0
- PresenceSensor0
- ProximitySensor0
- TemperatureSensor0
- I4DeviceSimulation
- TemperatureSensor01
- TemperatureSensor02
- PLC1
- DeviceSet
If only the devices under PLC1 may be used, /Objects/DeviceSet/PLC1 should be added as a root.
Writing a Value to an OPC UA Device
The OPC UA interface allows writing values to attributes on an OPC UA server. Select the write option when starting the wizard and select the desired devices, the same way as shown in Reading Values From Sensor Instances.
Warning
Be cautious when using write functions, as they may have an impact on the device.
Fieldmapping
The selected configuration is loaded and the available variables are shown. It will look like this:
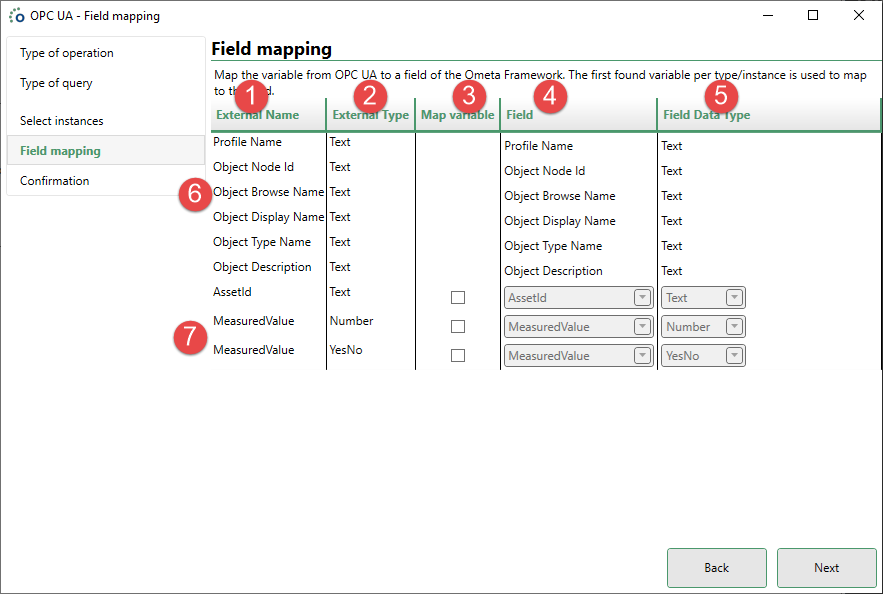
| Number | Description |
|---|---|
| 1 | This is the name of the variable on the OPC UA device. |
| 2 | This is the datatype of the variable, converted to an Ometa framework data type. |
| 3 | Option to map the variable or ignore it. Some system fields are created by our OPC UA connector and can't be disabled, write methods do not have any system fields. |
| 4 | The name of the field the value will be parsed into. |
| 5 | The target field data type, the OPC UA connector will try to parse it on a best effort basis. |
| 6 | This is one of the system fields used by the OPC UA connector. |
| 7 | Multiple variables with the same name are possible when they have different data types. This happens because different nodes use the same fieldname (e.g. a height measurement and a lever status). These can be mapped to the same field, but will require a more generic field type able to convert both values, like text. Another option is to map them to separate fields while retaining the data type. |
Note
The mapping of multiple variables to the same field is done by setting multiple values as the external name of that field. This means that the different values are separated by a ';#' token, e.g. Value;#AssetId;#Measurement
However, setting multiple values in an external name is only supported while reading. When writing, the field cannot have more than one external name value. That behaviour is implemented to limit issues as writing data to variables accidentally may have unforeseen consequences.
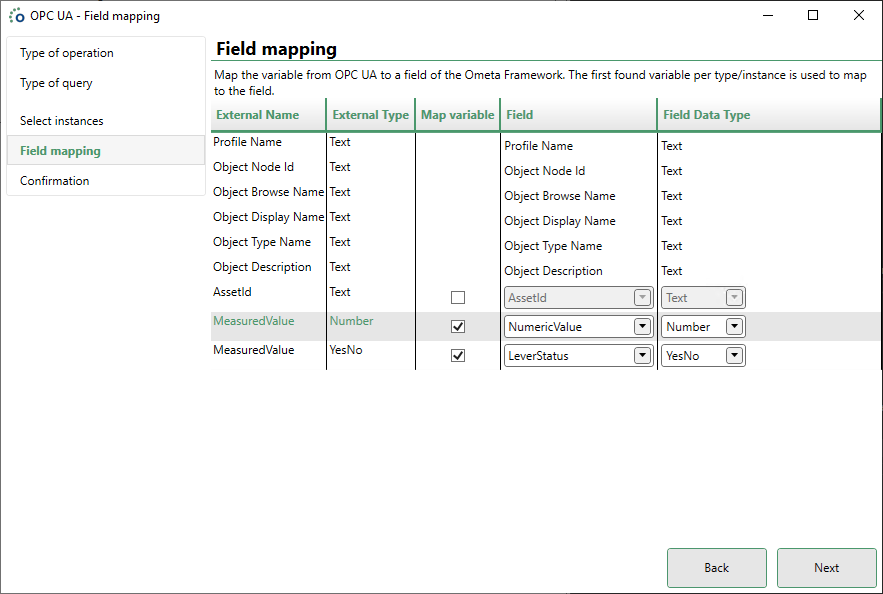
Opening the wizard again after configuring a method will load the previous field mapping and additional variables if necessary.
Tip
The wizard will never delete existing fields from a method, only modify the external name and data type.
After clicking next, a short summary is shown of the configured method. Change the name of the method if desired and click finish to generate the method. You can now run the method with the same profile used in the wizard to get the values from OPC UA.

Variable Source and Server Timestamps
Every variable within OPC UA has 2 timestamps assigned to it: the source and server timestamp. The source timestamp represents the date and time that the value (as set in the variable) has been generated, measured, etc. The server timestamp is the date and time on which the OPC UA server either received the variable value, or acknowledged the value to be accurate.
These timestamps are useful when it is necessary to know when a variable has been changed on the OPC UA server side.
Follow these links for more detailed information: source timestamp and server timestamp.
The wizard won't generate any timestamp fields in the object when selecting variables for output. The reason behind this behaviour is that those timestamps are usually only needed in specific and more advanced use cases while the main goal of the wizard is to provide a starting point for connecting the framework to OPC UA servers and devices.
Note
The source and server timestamp fields are only available during a read action of device information. As those timestamps cannot be changed from a user perspective, the framework interface does not support using such timestamp fields when writing data to the OPC UA server.
Important to know is that the timestamps are only available if the variable itself is also read by the method at the same time. This is a limit imposed on how the interface reads the variable data. But this way users can be certain that the timestamps reflect the value state of the variable within the OPC UA server, meaning the value and timestamps were read in a single action and not in 2 or more de-coupled read actions.
An example of steps to add the source timestamp to a method:
For this example, a method with the following field definitions is used:
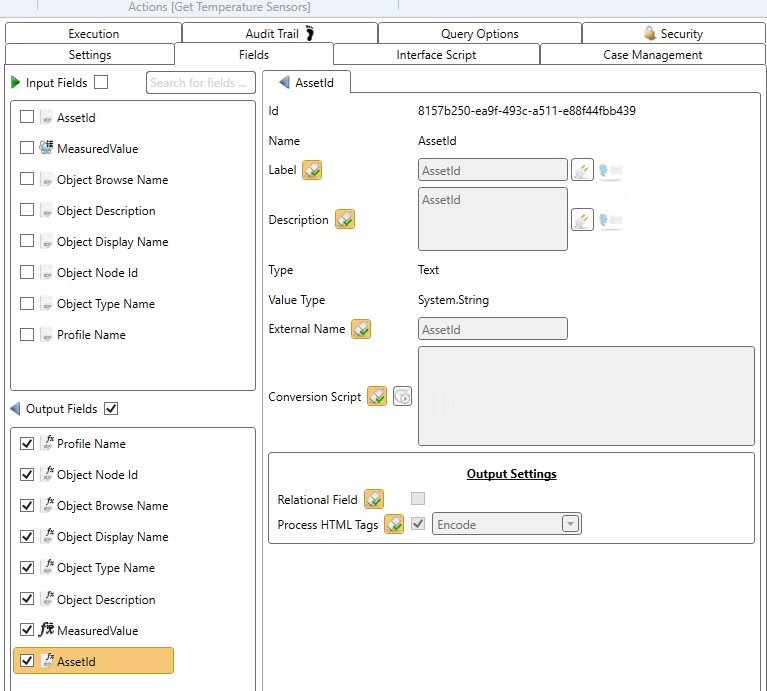
This method generates the following output when run:

Add a new output field called Asset Timestamp of type DateTime. Change the external name to AssetId SourceTimestamp. Note: the space between AssetId and SourceTimestamp is intentional and required, and additionally the word SourceTimestamp is indeed a single word with an uppercase S and T.
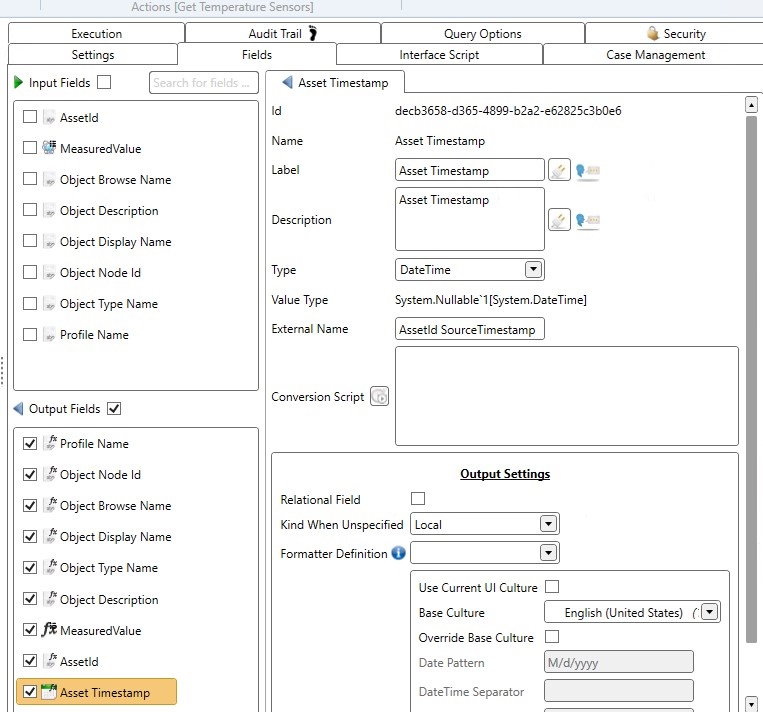
Save the changes and rerun the method:

After updating the AssetId variable value, the method returns the following data:

In the example above, the first part AssetId in the external name refers to the real variable name of the device/sensor in the OPC UA server. As seen in step 1 of the demo, the standalone field AssetId has exactly the same value in its external name. The second part, SourceTimestamp, is an implicit reference to the real source timestamp linked to the AssetId variable.
To the server timestamp use the reference ServerTimestamp, e.g. AssetId ServerTimestamp. Also, here a single space must be present between the real variable name and the timestamp reference.