On-Behalf-Of Flow
An on-behalf-of (OBO) flow in Ometa describes the scenario of our framework using the identity of the requesting party to access secured resources.
This is also referred to as delegation in OAuth, the intent is to pass a user's identity and permissions through the request chain.
The OBO flow is supported in our OAuth enabled interfaces which are REST, OData and WebService.
Note
At this moment we only support OBO flows through Microsoft Entra for users authenticated with the Microsoft provider.
You can find more information about OBO in entra here.
Ometa Framework Entra Application Registration
To be able to use OBO, you'll need a Microsoft Entra Application registration which represents our Ometa Framework.
If you use the Microsoft provider to authenticate users in our framework, you already have this registration and can rename it to something more generic like 'Ometa Framework' if you want.
If no application is present in Microsoft Entra, follow the article of our Microsoft provider to configure a new application registration.
Note
Remember that OBO flows are also referred to as delegation flows in OAuth. In order to be able to use delegation, you'll have to configure one or more api permissions in the Entra Application of the delegation type.
Example 1: SharePoint List Item Update
If you want to use OBO for requests against standard Microsoft API's (e.g.: the Graph API), you can do this out-of-the box by selecting which api permissions you want delegation for.
Let's say you have defined a REST method in the Ometa Framework which can update a list item in a SharePoint list. With the OBO flow, it is now possible to do that update in name of the requesting user instead of the application credentials itself.
API Permission
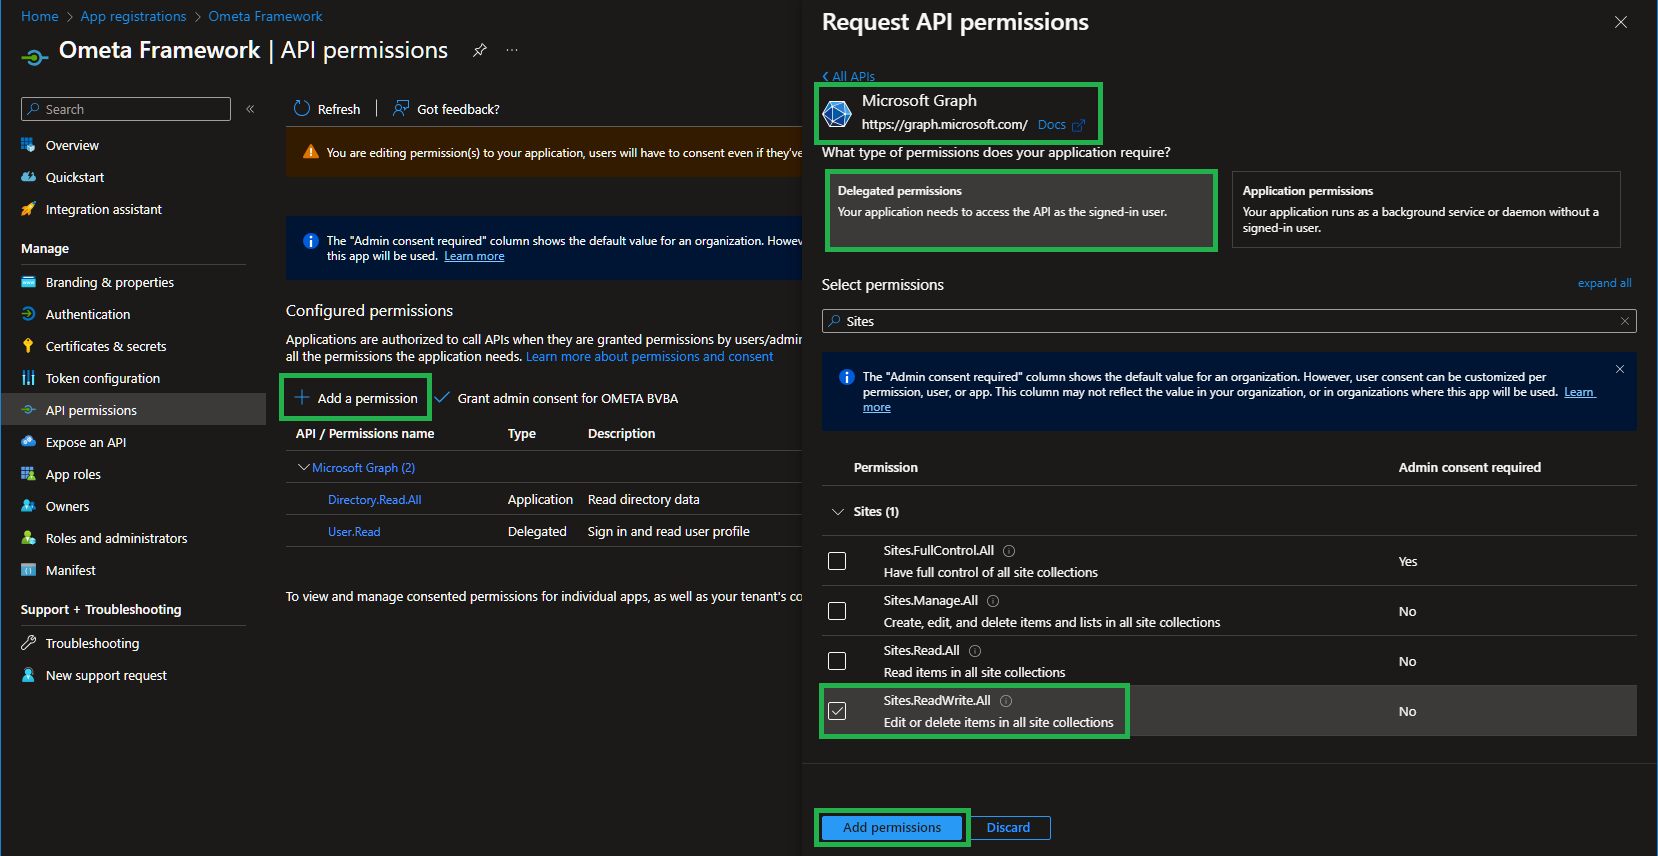
To be able to update a list item in name of the user, you'll have to add the Sites.ReadWrite.All API permission as Delegated to the Ometa Framework Entra Application in Azure.
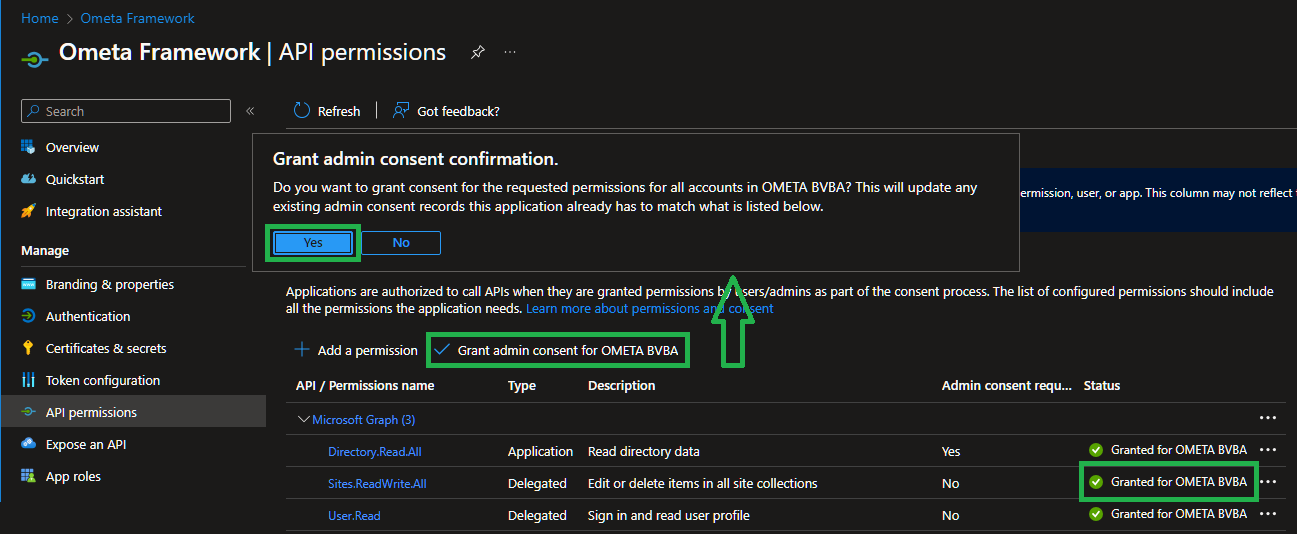
After that, don't forget to grant admin consent to this new API permission. In most cases, users will not be able to consent this new API permission due to tenant configuration.
Important
To prevent the error that a user or administrator didn't consent, it is strongly recommended to grant admin consent to this new API permission.
If you forget to do this, you will not be able to use the OBO flow in most cases.
Ometa Method
Your interface script could look like this for updating the Color and the Price of an item in the Products list.
Method=PATCH
Path=/sites/{$Site Id}/lists/Products/items/{$Item Id}
Body={    "Color": "{$Color}",    "Price": "{$Price}" }
REST Profile
Besides the normal profile fields, your profile must have this configuration.
| Name | Value | Remarks |
|---|---|---|
| Url | https://graph.microsoft.com/v1.0 | |
| OAuth Url | https://login.microsoftonline.com/{TenantId}/oauth2/v2.0/token | {TenantId} is the identifier of your Microsoft 365 tenant. |
| OAuth Scope | Sites.ReadWrite.All | This is the Graph API permission we just added to our Entra Application. This one is required for reading and writing content on a SharePoint site. |
| OAuth Client ID | Client Id of the Ometa Framework Application in Microsoft Entra | |
| OAuth Client Secret | Client Secret of the Ometa Framework Application in Microsoft Entra | |
| OAuth Grant Type | urn:ietf:params:oauth:grant-type:jwt-bearer | |
| OAuth Use On Behalf Of | True |
Important
Microsoft Entra requires a client, requesting OBO tokens (in this case the Ometa Framework), to identify themselves with a client id and secret.
So to be able to work with OBO, you'll have to create a secret on the Application Registration.
Consult our Microsoft article to see how you can create a secret.
Now whenever this method is executed on that REST profile, an OBO token will be requested in name of the requesting user and the update itself will happen with the user's identity.
Example 2: Expose a Custom Entra Application
In this example we will be exposing our own custom Entra Application to be used with an OBO flow. This Entra Application called Ometa Order System will manage the authorization of our own made order system.
In the code of our own made order system, we use three scopes:
- order.read
- order.write
- order.delete
The public API of our order system is configured to use the Ometa Order System Entra Application for handling authentication and authorization for us.
For this to work, you'll have to configure those scopes in the Entra application itself under Expose an API.
Note
The Entra application we will be configuring now is a different one than the Ometa Framework application itself.
The Ometa Order System application represents a custom made software component using Entra for its authentication and authorization.
Configure an Application ID URI
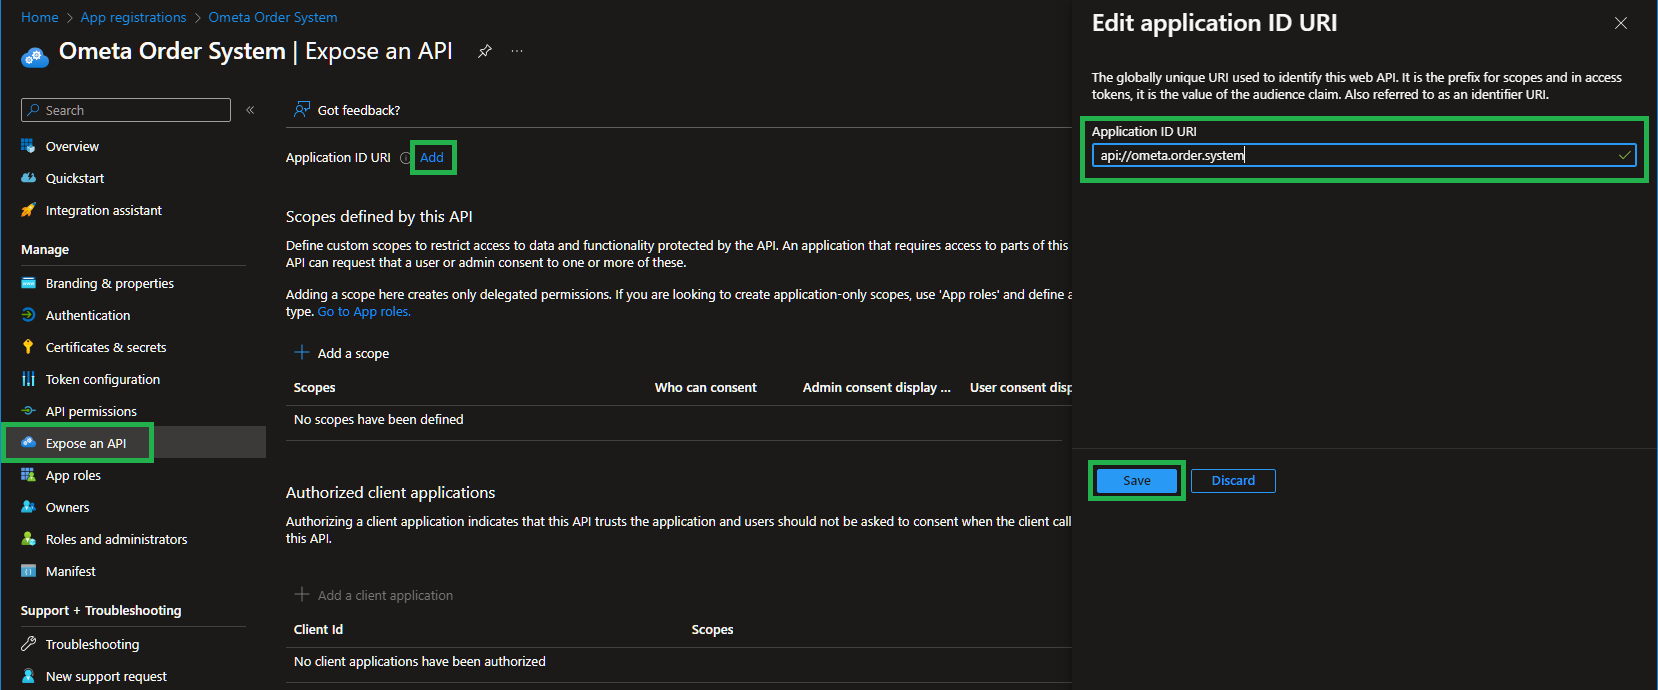
Due to the fact that there can be many Entra Applications, we'll have to configure a unique URI which will be the prefix for our scopes in tokens.
In our example we used api://ometa.order.system as the unique URI.
Configure Scopes
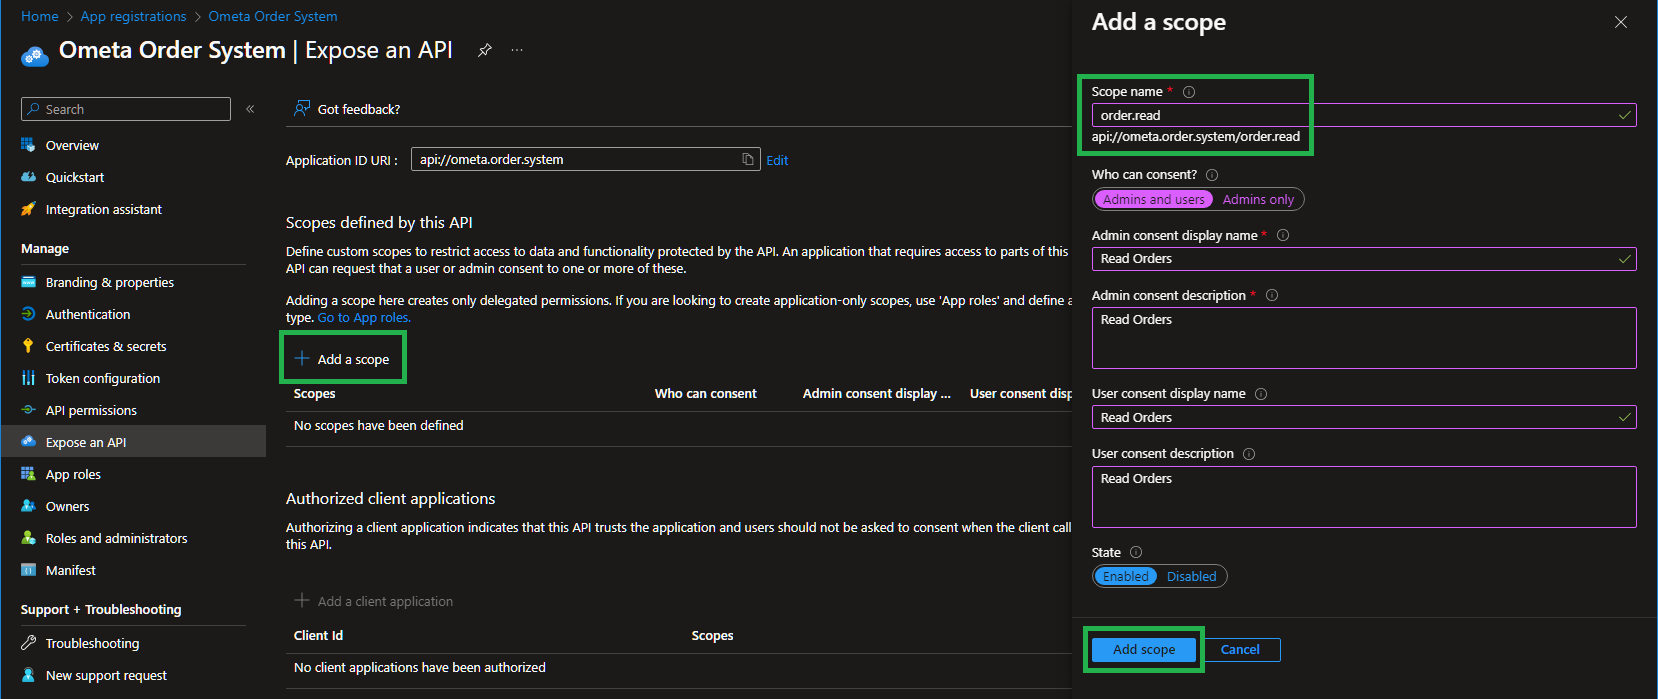
Now you'll have to configure the scopes which will be exposed for delegation. We will be adding all 3 scopes used by the order system, so you have to do this 3 times.
Important
You can configure who can consent to this scope. Due to the fact that the Ometa Framework will be requesting OBO tokens in a non-interactive session, we encourage you to set this to Admins only and grant admin consent on the Entra Application where the scopes will be used as API permissions (see the next steps).
Add Authorized Client Application
Due to the fact that our Ometa Framework will request OBO tokens in a non-interactive session, you are required to configure a trust between the Ometa Framework Entra Application and the Ometa Order System application. Otherwise an error will occur stating that the user can't consent to the requested scopes.
You can do this by adding the Client Id of your Ometa Framework Entra Application to this application and enabling all scopes.
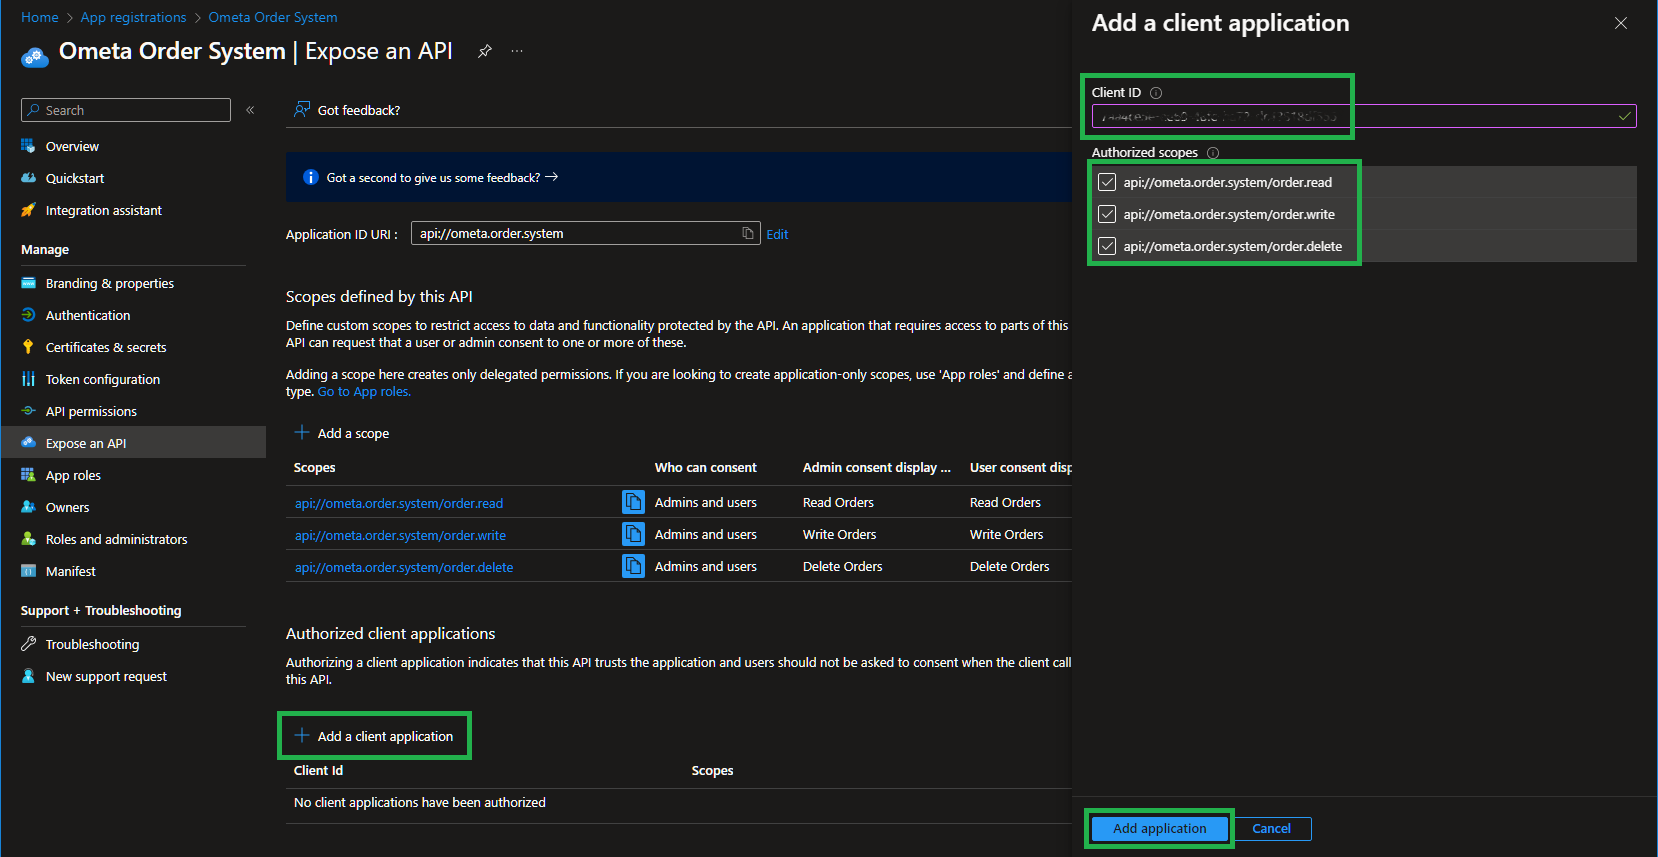
Important
Double-check the client id. You have to use the client id of your Ometa Framework Entra Application.
Configuring the wrong client id will make it impossible for the Ometa Framework to request OBO tokens.
API Permissions on Ometa Framework
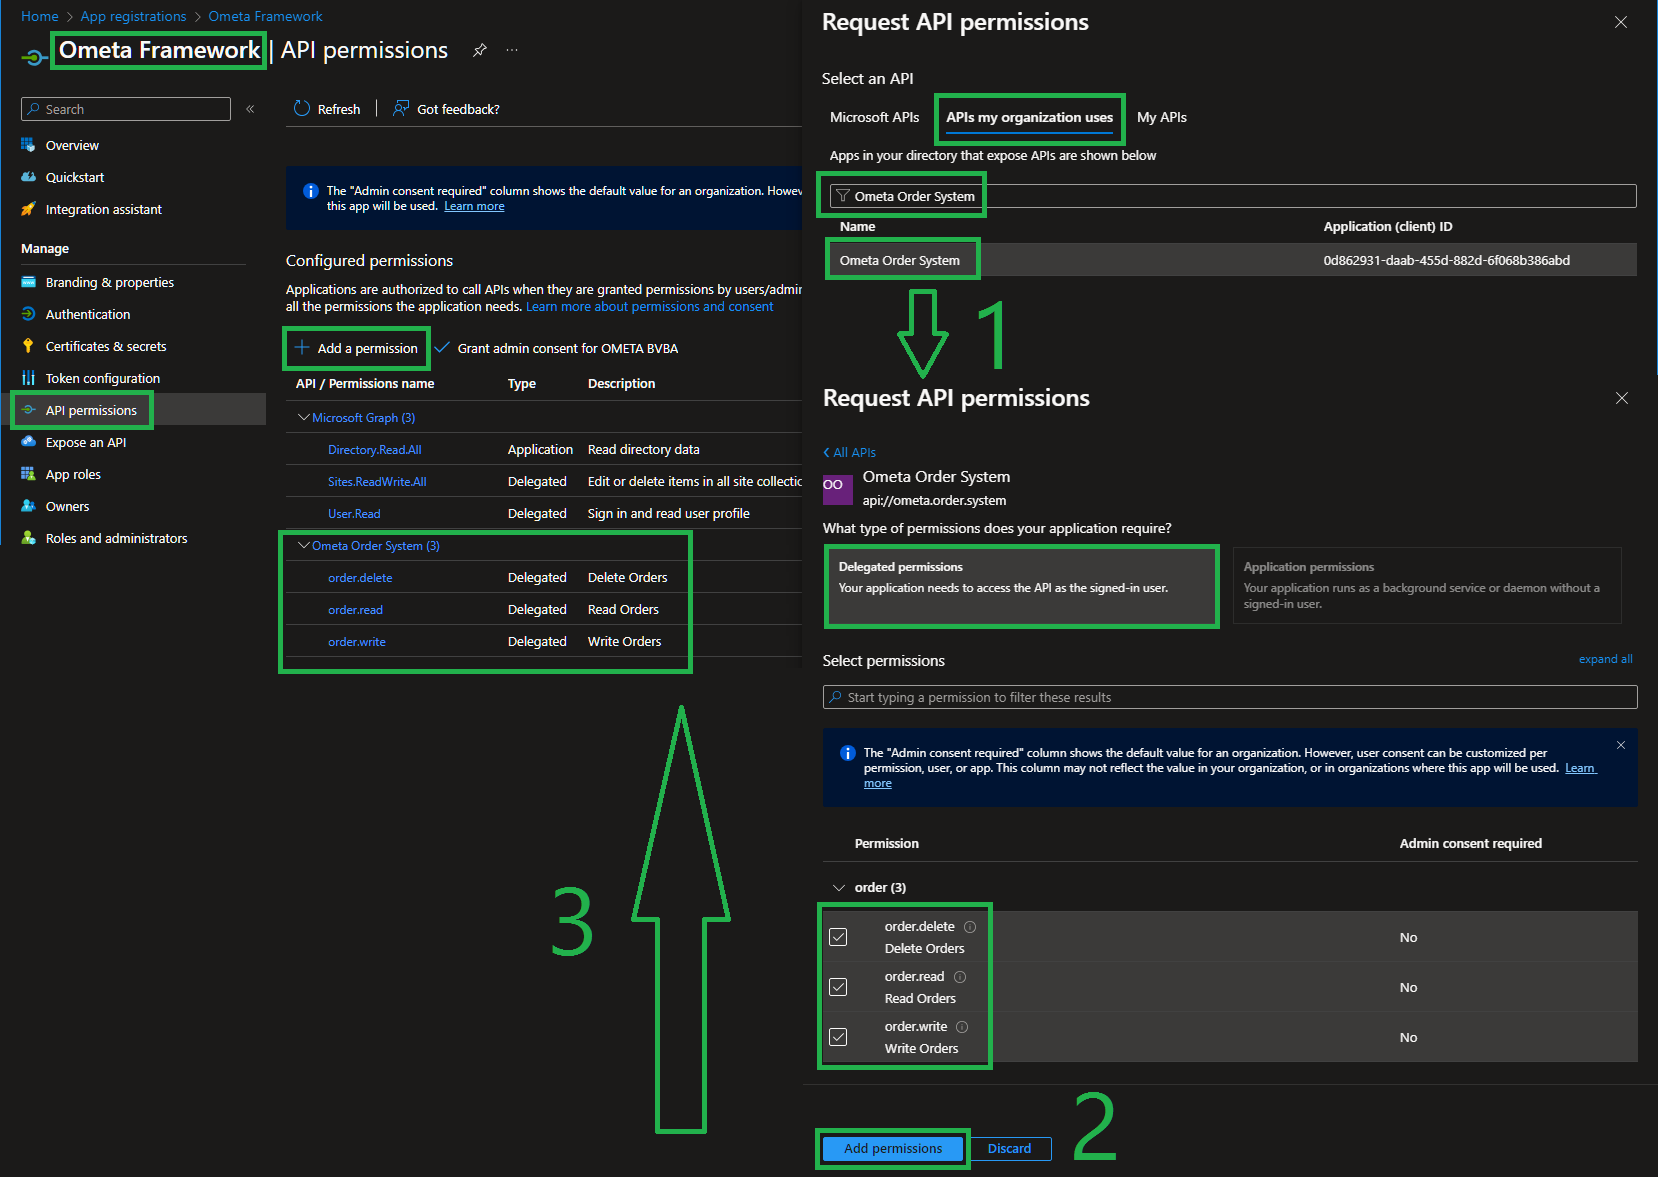
Now you'll have to configure those newly created scopes as delegated API permissions on the Ometa Framework Entra Application.
Navigate to the Ometa Framework Entra Application and configure the API permissions as shown below.
Note
Because you configured the client id of the Ometa Framework application as an authorized client application on the Ometa Order System for those 3 scopes, you don't have to give admin consent and users will not be bothered with consent screens for these 3 scopes.
Ometa Method
Your interface script could look like this for creating an order in our own made Ometa Order system.
Remember however that this example is purely fictional and can look completely different for your own systems.
Method=POST
Path=/orders
Body={    "CustomerId": "{$Customer Id}",    "Order Reference": "{$Order Reference}" }
REST Profile
Besides the normal profile fields, your profile must have this configuration.
| Name | Value | Remarks |
|---|---|---|
| Url | https://erp.ometa.net | The url of the public API of our own made Order System. |
| OAuth Url | https://login.microsoftonline.com/{TenantId}/oauth2/v2.0/token | Because we use Microsoft Entra as the Authority in our own made order system, this has to be the token endpoint of Entra. {TenantId} is the identifier of our Microsoft 365 tenant. |
| OAuth Scope | api://ometa.order.system/order.read api://ometa.order.system/order.write api://ometa.order.system/order.delete | These are the API permissions of the Order System we just added to our Ometa Framework Entra Application. Multiple scopes are separated with a space. |
| OAuth Client ID | Client Id of the Ometa Framework Application in Microsoft Entra | |
| OAuth Client Secret | Client Secret of the Ometa Framework Application in Microsoft Entra | |
| OAuth Grant Type | urn:ietf:params:oauth:grant-type:jwt-bearer | |
| OAuth Use On Behalf Of | True |
Important
Microsoft Entra requires a client, requesting OBO tokens (in this case the Ometa Framework), to identify themselves with a client id and secret.
So to be able to work with OBO, you'll have to create a secret on the Application Registration.
Consult our Microsoft article to see how you can create a secret.
Now whenever this method is executed on that REST profile, an OBO token will be requested in name of the requesting user and the order creation itself will happen with the user's identity.
Troubleshooting
Many subtle things can go wrong when using OBO flows in Microsoft Entra. Luckily most of them can be fixed by rechecking your configuration.
Error: bad Request - no consent
Most of the time the error looks something like this:
Requesting an access token failed: BadRequest Bad Request invalid_grant AADSTS65001: The user or administrator has not consented to use the application with ID 'Guid of the Ometa Framework Entra Application' named 'Ometa Framework'. Send an interactive authorization request for this user and resource.
Check the following things to resolve this error:
- If there are Microsoft API scopes in the Ometa profile, double-check if you have granted admin consent to all of these scopes. Check API permission for more details on how to do this.
- If there are API scopes of a custom Entra Application in the Ometa profile, double-check if you have authorized the client id of the Ometa Framework Entra Application AND the scopes in the custom Entra Application owning these scopes. Check add authorized client id for more details on how to do this.
Error: No Access Token Is Present
This means the request has been made without an Ometa access token. This can only happen with anonymous requests.
Check the following things to resolve this error:
- If your user is making the request from within an ADM, make sure the view and/or method has been configured to block anonymous requests.
- If the request is made from within a managed DLL, ensure that the current Ometa access token is send along.
Error: The current user is inactive
This means that the user contained in the Ometa access token has been disabled by an administrator. Re-enable the user to resolve this error.
Error: No user could be found in the current access token
This means that the request has been made with an Ometa access token of an application. Usually this is caused by the fact that an Ometa access token was requested with the client_credentials flow instead of a human interactive session. Normally this can only occur within a managed dll.
Ensure that the request is made with the user's token in the managed dll.
Error: The user contained in the access token was not found in the system
This means that the Ometa user contained in the access token has been removed after the access token was requested.
If the user was deleted by mistake, the user must reauthenticate within the Ometa Framework to get a new Ometa user and a new access token.
Error: No user could be found for the requested provider
This means that the Ometa user has been correctly authenticated but with the wrong provider or that the user doesn't have a link to the user of the correct provider through a person.
At this moment we only support OBO flows through the Microsoft provider. Therefor a Microsoft user is required for the OBO flow to work.
Make sure the user is authenticated through the Microsoft provider.
Error: No user token was found for the current user that could be used for the requested provider
This means that the Ometa user has been correctly authenticated and a user for the OBO provider has been found, but without a valid access token for that provider.
If the user has been authenticated with another provider (e.g.: Windows), it will not have an access token for the Microsoft provider resulting in the fact that the Ometa Framework is unable to request an OBO token from Microsoft.
To resolve this issue, make sure the user authenticates through the Microsoft provider.