Document Approval
Ometa offers a generic document approval solution to work with SharePoint documents. This solution is build upon case management and tasks. The page and object views used for this approval are installed by default with the Ometa Framework.
Supported Versions
The document approval is currently only supported on SharePoint Online.
Implementation
This section will guide you through the implementation of the document approval flow on your project.
Filling in the Profiles
Before using the document approval flow different profiles used in the document approval solution must be filled in.
- Open the Profiles tab of the Business Connector.
- Select the profiles below and fill in the fields.
SharePoint Building Blocks
This profile will be used to ensure the document approval pages.
REST SharePoint
Documents displayed on the approval page are retrieved using the SharePoint REST API. Refer to the Profile section of the Documents ADM documentation.
DLL Document Approval
This DLL profiles is used for the document approval specific building blocks, for example for the generic library and the approval mails. The language of the ensured library fields and buttons can be set here.
Fill in the SMTP server details in this profile for the mails the document approval tasks are sending. By default, the subjects are set in English, but those can be edited.
The mail template folder can be changed to another containing the HTML-files for another language, by default this is set to the English templates. This path can be relative to the BCS_DLL 4 interface folder: %OMETA_INSTALLATION_MAP%\TopDir\BC\Bin\Interfaces\BCS_DLL 4. Make sure the name(s) of the files are the same.
Create the (System) Document Approval Lifecycle
First, we need to create the Document Approval lifecycle.
- Open the Objects tab of the Business Connector.
- Go to the object DCS.System and click on the method Ensure System Lifecycles.
- Click on Test Method.
- Select the default DCS Utilities profile.
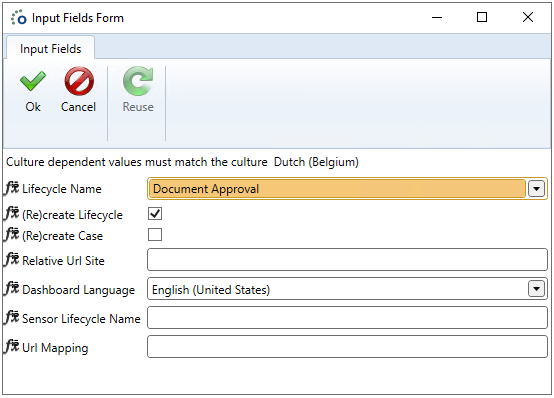
Select Document Approval in the Lifecycle Name dropdown. Leave the other fields with the default values, they are not important for this lifecycle.

Create the (System) Document Approval Pages Grouped Action
- Open the Objects tab of the Business Connector.
- Go to the object DCS.System and click on the method Ensure System Grouped Actions.
- Click on Test Method.
- Select the default DCS Utilities profile.
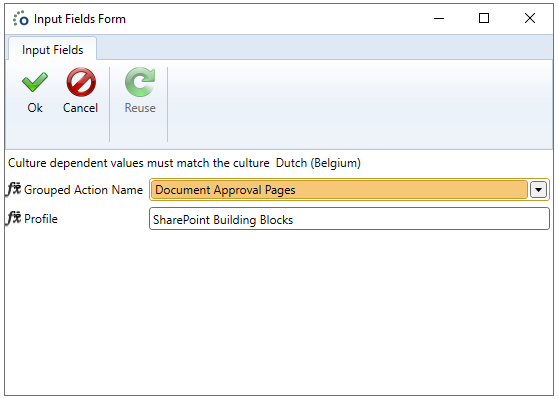
Select Document Approval Pages in the Grouped Action Name dropdown. Select the building blocks profile in the Profile field to execute the actions on.

Create a State Action for the Document Approval Pages on your Lifecycle
The grouped action we created earlier needs to be added to the state of a lifecycle. This is the lifecycle which will use the document approval on its site.
- Open the Case Management tab of the Business Connector.
- Select your lifecycle.
- Go to Flow Designer.
- Right-click on the state responsible for the creation of the site and click Open Details.
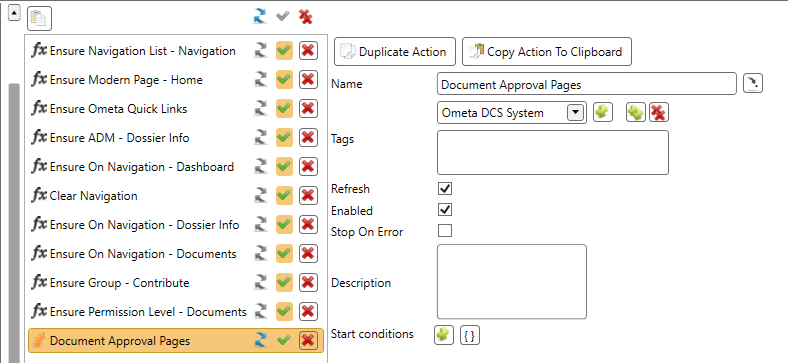
Add the Document Approval Pages grouped action to this state. Make sure the action is set to refresh.

Refresh the case(s) of this lifecycle.
Configure the Document Libraries
To work with approval the document libraries need a couple of fields. Those fields can be ensured on a library with a generic building block. The following fields will be added:
- Document Type: choice field to specify the type of the document, can be set to multi value.
- Year: the year of the document.
- Document Tag: a text field to set the tag of the document.
- Approval Status: the status of the document approval for the document.
- Approval Log: a multi line text field with the log entries of the approval.
Take the following steps to configure those fields on the document libraries:
- Open the Case Management tab of the Business Connector.
- Click on Methods in the ribbon.
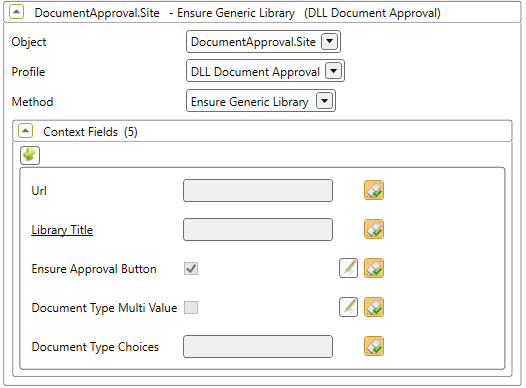
- Make sure a DCS method is added for the method Ensure Generic Library of object DocumentApproval.Site.
- Close the methods window.
Add this action to every document library where document approval will be used. For more information about this method, refer to the API.

Refresh the case(s) with the updated library actions.
Using the Documents ADM
When using the Documents ADM to display the SharePoint documents you can disable the Ensure Approval Button option on the Ensure Generic Library actions, as this adds a ribbon-button to the SharePoint document library view.
Linking to the Approvals Page
You can link to the Approvals.aspx by using a list function on your multi record view.
Add the following fields as url context to the url:
- OmetaFieldRelativeUrl: server relative url to the SharePoint list: ex.: '/sites/Team1/Shared%20Documents'
- OmetaFieldLibrary: the title of the library, ex.: 'Workdocuments', 'Documents'
- OmetaFieldSPWeb.Url: the full url to the SharePoint site, can be left empty when working with documents of the root site ex. 'https://yourcompany.sharepoint.com/sites/TeamA/Subsite1'
- OmetaFieldFolder: the name or path of the folder(s) to filter, ex. 'RootFolder/Subfolder1', 'Folder1'
Make sure the relative url and library values are encrypted using the BC.Utilities.Encrypt function and the values are encoded for a URL, for example: https://[your SharePoint site]/SitePages/Approvals.aspx?OmetaFieldRelativeUrl=[encrypted relative URL value]&OmetaFieldLibrary=[encrypted library value].