Authority Services
The authority service is responsible for managing all flows to the various authentication providers and creating and processing the access tokens which contain the claims of the user/client.
Minimum requirements
Login to the server where you installed the Authority Service and ensure that this server meets the minimum system requirements of an Ometa Framework server.
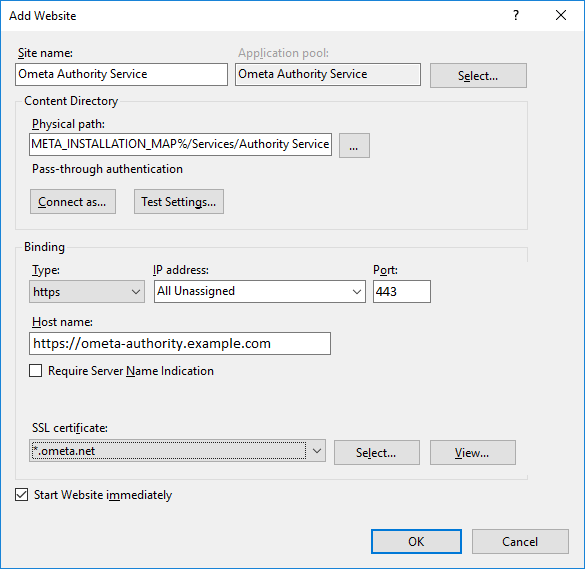
Application pool and IIS site
Ensure an application pool and an IIS site (Ometa Authority Service) mapped to the
%OMETA_INSTALL_ROOT%\Ometa Software Suite\Services\Authority Servicedirectory.Ensure an HTTPS binding to the site with a port of your choice, a valid hostname and ensure that a valid SSL certificate is chosen.
Apply the following Advanced Settings on the website:
Advanced Settings Value (General) Preload Enabled True Apply the following Advanced Settings to the application pool:
Advanced Settings Value (General) Start Mode AlwaysRunning Process Model Identity * User which has access to %OMETA_INSTALL_ROOT%.
* When using trusted connections (integrated security) read / write access to the Ometa Framework database.
* When using Windows as authentication provider, it should be able to contact the Active Directory server.Idle Time-out (minutes) 0 Load User Profile True (If you disable this, users will have to re-authenticate each time the app pool recycles) Recycling Regular Time Interval (minutes) Recommended daily (night time) when there is no or less network traffic. Refer to the recycling article for more background information. 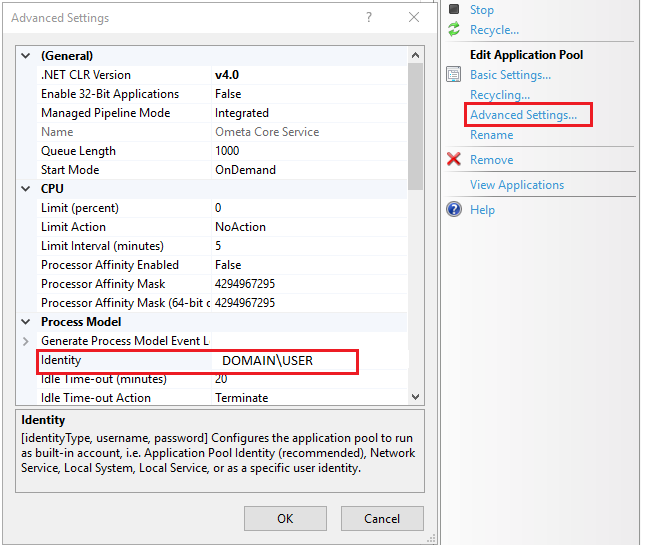
Logging
Change the default IIS logging location. The default location is the system drive. When this drive runs out of disk space, it can severely impact the overall operation of the Ometa Framework.
- Open IIS Manager.
- In the Connections pane, click on the server name to select the server level.
- In the **Features View **pane, double-click Logging.
- In the Logging window, click Browse next to the Directory field and select the new location on the separate disk.
- Click Apply to save the changes.
- It is also advisable to clean the logs after X days. Follow the Microsoft documentation and configure a scheduled task: Delete old log files by script
Database Connection String
The connection information to the Ometa Framework database must be configured correctly. Please consult the article Check Database Connection Configuration for more information.
Configure the Signing Certificate
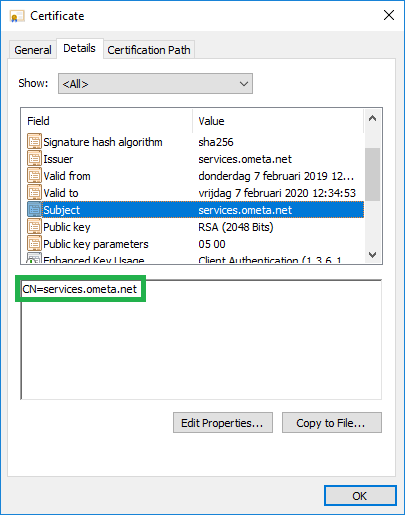
To provide users & clients with tokens, the authority service needs a valid certificate to sign those tokens. The easiest way to setup this signing certificate is to copy/paste the distinguished name of the certificate you want to use for this in the appsettings.json file.
Tip
Certificates can be found by doing the following:
- Open Windows Start
- Search
Manage Computer Certificates - Navigate to the certificate that is used in IIS (e.g. Trusted Root Certificates/Certificates)
- Open your certificate
{
  // ...
  // Other JSON Settings
  // ...
  "SigningCertificate": "CN=services.ometa.net"
  // ...
  // Other JSON Settings
  // ...
}
Tip
If you experience issues with setting up the signing certificate, you should look into the log file of the Authority Service (check the troubleshooting section).
Upon starting the Authority Service, it will log all the distinguished names of the certificates it can use to this log file. However, this does not mean that those certificates are valid.
It just means that they can be found by the Authority Service.
2019-02-07 14:37:02.8409334 [Information-1]: Possible certificate: CN=*.ometa.net, O=Ometa, L=Wommelgem, C=BE
2019-02-07 14:37:02.8411791 [Information-1]: Possible certificate: CN=services.ometa.net
2019-02-07 14:37:02.8412320 [Information-1]: Possible certificate: CN=localhost
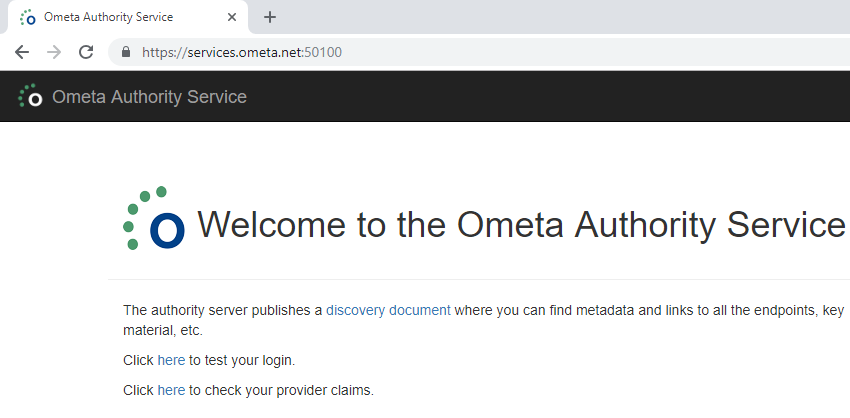
Test the Authority Service
Tip
Always restart the Authority Service when changing settings in the appsettings.json file.
Test the Authority Service by navigating to https://your-site-binding:port. This should succeed without a security warning from the browser. Note that the "Click here to test your login" won't work yet.
Below topics are more advanced configuration settings and the troubleshooting guide in case of problems.
Enabling LDAPS Support for AD
The authority service can connect to AD via LDAP to add properties and groups as claims. Usually the service connects via the default LDAP protocol on port 389. However due to security reasons a shift is being made to use LDAPS (LDAP over SSL) connections.
Enabling such connections can be done via configuration in the appsettings.json. The DomainPath setting must have the port number 636 in the path, otherwise the authority
service will not recognise that LDAPS should be used.
{
  // ...
  // Other JSON Settings
  // ...
  "LdapConfiguration": {
    "DomainPath": ":636"
  }
}
The example setting above tells the authority service to use the AD settings as defined on the domain joined machine / server but connect over LDAPS.
Configure Dirty Time of AD Group Claims Sync
Due to the fact that AD group memberships can change within the lifetime of a user session, we have built-in support for syncing the AD group claims whenever an interaction is detected with our Authority Service.
This interaction occurs for example:
- when authenticating in an ADM;
- every 30 minutes when there is an ADM somewhere in an open browser window;
- when authenticating in the WpfGUI;
- when an access token is about to get expired (by default the lifetime of an access token is 1 hour).
When this interaction occurs, a check is made by the Authority Service if the AD group claims must be synchronized for that specific user.
By default that synchronization can occur one time per 8 hours. However you can configure this setting by adding/updating an entry in the config table of the database.
The value represents how many hours must have passed before a new synchronization of the AD group claims occurs for that user. This settings can vary between 1 and 168 hours (1 week).
| Name | Value |
|---|---|
| Authority Hours Until Ad Refresh | 1 |
Note
The dirty time for syncing AD group claims is checked per user. The synchronization only occurs for the specific user that interacts with our Authority Service.
Configuring SAML 2.0 Assertions
The authority service is capable of creating SAML 2.0 assertions for provided access tokens. The OData service already implements this functionality when required.
This is a full example of the settings that can be configured in the appsettings.json of the Authority Service regarding SAML 2.0 assertions.
{
  // ...
  // Other JSON Settings
  // ...
  "Saml2Assertions": {
    "Issuer": "Ometa Authority Service",
    "Subject": {
      "NameIdentifierRegexToClear": "(.*\\\\)",
      "NameIdentifierFormatUri": "urn:oasis:names:tc:SAML:1.1:nameid-format:unspecified",
      "Confirmations": [
        {
          "MethodUri": "urn:oasis:names:tc:SAML:2.0:cm:bearer",
          "RecipientUri": "https://oauth.services.net/connect/token"
        }
      ]
    },
    "Conditions": {
      "AudienceRestrictions": [
        "DEVELOPERS",
        "ADMINS"
      ]
    },
    "Statements": {
      "AuthenticationStatements": [
        {
          "ClassReferenceUri": "urn:none",
          "DeclarationReferenceUri": "urn:none"
        }
      ]
    }
  }
}
Issuer
If not configured, the issuer will be Ometa Authority Service.
<saml:Assertion ID="_a11a62e1-70bf-4509-8e17-88cc0559a73e" IssueInstant="2021-02-19T12:22:27.931Z" Version="2.0" xmlns:saml="urn:oasis:names:tc:SAML:2.0:assertion">
    <saml:Issuer>Ometa Authority Service</saml:Issuer>
</saml:Assertion>
Subject
The name identifier in the SAML 2.0 assertion will be filled in with the provider key found in the access token of the current user. For Windows AD, this will be DOMAIN\Username, for other providers like Microsoft O365, this can be an email address.
If your OAuth token provider needs to strip off some information of the default name identifier, you can replace it with a regex configured in the NameIdentifierRegexToClear setting.
For example: to strip off the domain of the user OMETA\ometauser, you can set (.*\\) on NameIdentifierRegexToClear. The result in the SAML 2.0 assertion will be:
<saml:Subject>
    <saml:NameID>ometauser</saml:NameID>
</saml:Subject>
Other Settings
The identifier format uri to set in the name identifier. In our example urn:oasis:names:tc:SAML:1.1:nameid-format:unspecified.
<saml:NameID Format="urn:oasis:names:tc:SAML:1.1:nameid-format:unspecified">ometauser</saml:NameID>
Claims in Access Token
All claims present in the access token of the user will be set as attribute values in the SAML 2.0 assertion.
<saml:AttributeStatement>
    <saml:Attribute Name="nameidentifier">
        <saml:AttributeValue>OMETA\ometauser</saml:AttributeValue>
    </saml:Attribute>
    <saml:Attribute Name="surname">
        <saml:AttributeValue>ometa</saml:AttributeValue>
    </saml:Attribute>
    <saml:Attribute Nam964e="givenname">
        <saml:AttributeValue>user</saml:AttributeValue>
    </saml:Attribute>
    <saml:Attribute Name="name">
        <saml:AttributeValue>ometa user</saml:AttributeValue>
    </saml:Attribute>
    <saml:Attribute Name="adgroup.id">
        <saml:AttributeValue>S-1-5-33-54864598-2165198845-54657651-1089</saml:AttributeValue>
        <saml:AttributeValue>S-1-5-33-54864598-2165198845-54657651-1092</saml:AttributeValue>
        <saml:AttributeValue>S-1-5-33-54864598-2165198845-54657651-1091</saml:AttributeValue>
        <saml:AttributeValue>S-1-5-33-54864598-2165198845-54657651-13659</saml:AttributeValue>
        <saml:AttributeValue>S-1-5-33-54864598-2165198845-54657651-45315</saml:AttributeValue>
        <saml:AttributeValue>S-1-5-33-54864598-2165198845-54657651-42847</saml:AttributeValue>
        <saml:AttributeValue>S-1-5-33-54864598-2165198845-54657651-31025</saml:AttributeValue>
        <saml:AttributeValue>S-1-5-33-54864598-2165198845-54657651-513</saml:AttributeValue>
    </saml:Attribute>
    <saml:Attribute Name="adgroup">
        <saml:AttributeValue>OMETA\Admins</saml:AttributeValue>
        <saml:AttributeValue>OMETA\Developers</saml:AttributeValue>
        <saml:AttributeValue>OMETA\Domain Users</saml:AttributeValue>
        <saml:AttributeValue>Everyone</saml:AttributeValue>
        <saml:AttributeValue>BUILTIN\Users</saml:AttributeValue>
        <saml:AttributeValue>NT AUTHORITY\NETWORK</saml:AttributeValue>
        <saml:AttributeValue>NT AUTHORITY\Authenticated Users</saml:AttributeValue>
        <saml:AttributeValue>NT AUTHORITY\This Organization</saml:AttributeValue>
    </saml:Attribute>
    <saml:Attribute Name="emailaddress">
        <saml:AttributeValue>ometauser@ometa.net</saml:AttributeValue>
    </saml:Attribute>
</saml:AttributeStatement>
Note
The only data that is always present in the SAML 2.0 assertion are issuer and the nameid of the subject. If another setting is not present in the configuration, it will be left out in the SAML 2.0 assertion.
Warning
The SAML 2.0 assertion will be signed with the certificate you configured in the step configure the signing certificate. Ensure that your OAuth token provider trusts this certificate.
Routing Multiple Service Instances
In some more advanced use cases where the Ometa framework has different data sources that cannot be accessed by the same Core service (like internal active directory), or providing data on multiple SharePoint environments, there can be a need to use multiple Core services originating from one framework installation.
This configuration is possible in the database ConfigDiscovery table. A new entry in this table can be created with the url of another Core service, generic REST or authority service.
Tip
Empty configurations will be ignored and use the default value from the Config table.
By creating and linking this entry to a ConditionSet, different conditions can be used to select a different service instance.
The following fields can be used to define the conditions on the discovery:
| Name | FieldType | Description |
|---|---|---|
| Request.IsExternalUser | YesNo | Indicates if the user is from outside the organisation. This field can only be true on SharePoint Online environments external users. For example, this field can never be true when connecting the Ometa Business Connector. |
| Request.Url | Text | The target url of the request. This is the Ometa authority service itself. |
| Request.IpAddressV4 | Text | The IP-address v4 of the user. |
| Request.IpAddressV6 | Text | The IP-address v6 of the user. |
| Request.UserAgent | Text | The user agent of the user. |
| Request.Host | Text | The host of the url. |
| Request.Referer | Text | The original address the request came from. This can be used to determine the SharePoint environment. |
| Request.AcceptLanguage | Text | The languages client can understand, and which variant is preferred. |
Tip
The available fields and their values can be validated in the logging of the core service upon discovery (either manual or by an ADM). The minimum log level for this is 'Information'.
Logging
- If anything goes wrong when testing the service and you get an error page similar like the one below, your best bet is to check any log files in the BAM log directory, default directory %OMETA_INSTALL_ROOT%\Log.
- If BAM is enabled on the directory where the logging takes place, it is also possible that BAM already processed the log file. In that case, you'll need to check the BAM portal. Look for a process with the name Ometa.Framework.Authority.
- When the above does not solve the issue, check Application Pools identity. (see Application Pool and IIS-Site)

When checking the log file, you'll need to search for a fatal error for example.
2019-02-07 08:55:39.4045121 [Fatal-1]: Application startup exception
	System.InvalidOperationException: certificate: 'CN = services.ometa.net' not found in certificate store
Troubleshooting
Logging
- If anything goes wrong when testing the service and you get an error page similar like the one below, your best bet is to check any log files in the BAM log directory, default directory %OMETA_INSTALL_ROOT%\Log.
- If BAM is enabled on the directory where the logging takes place, it is also possible that BAM already processed the log file. In that case, you'll need to check the BAM portal. Look for a process with the name Ometa.Framework.Web.
When checking the log file, you'll need to search for a fatal error for example.
2019-02-07 10:04:23.2232398 [Fatal-1]: Application startup exception
	System.Data.SqlClient.SqlException (0x80131904): A network-related or instance-specific error occurred while establishing a connection to SQL Server.
	The server was not found or was not accessible.
	Verify that the instance name is correct and that SQL Server is configured to allow remote connections.
	(provider: Named Pipes Provider, error: 40 - Could not open a connection to SQL Server) ---> System.ComponentModel.Win32Exception (53): The network path was not found
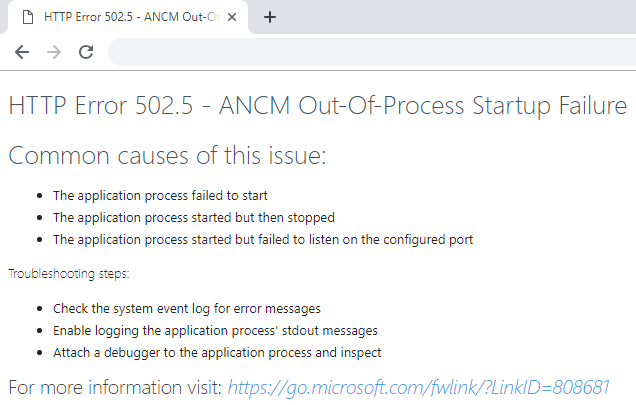
HTTP 502.5 - ANCM Out-Of-Process Startup Failure
If you encounter a 'HTTP 502.5 - ANCM Out-Of-Process Startup Failure' error when testing the service, this is mostly caused by the fact that you just installed the .Net runtime and IIS is not yet restarted. Open up a command prompt as administrator and execute an iisreset.
Important
It is not enough to restart IIS via the management tool. You really have to execute an iisreset command. If that doesn't solve the issue, you can also try to completely reboot the server.
Make sure your settings in the appsettings.json file are correct and your application pool identity has enough access rights to the database if you use trusted connection in the connection string.
Tip
Most common causes for fatal errors:
- Invalid appsettings.json (remember that a backslash needs to be escaped by another backslash)
- Distinguished name misspelled or belongs to a certificate which cannot be found
- Invalid or missing connection string
- Invalid or missing log configuration
- Not enough access rights to the database
- Not enough access rights to the log directory
An Error Occurred While Starting The Application
If you encounter 'An error occured while starting the application'. Check that your IIS Application Pools and sites are configured correctly.
Other (fatal) errors
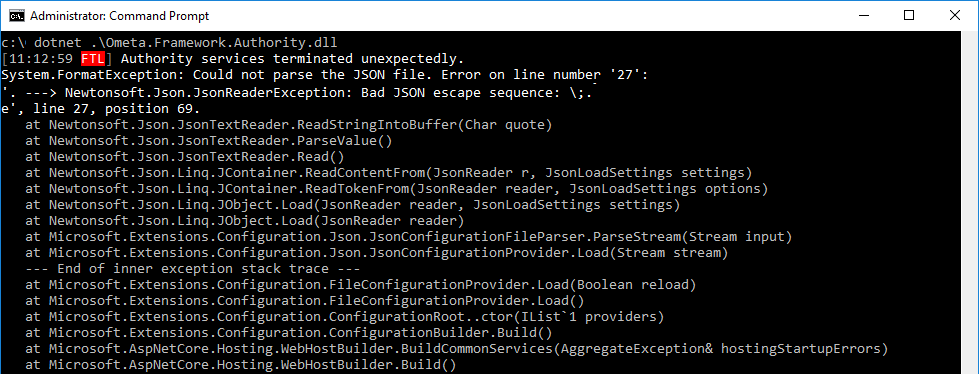
Some errors are thrown too early to be caught by the logging structures (ex: initializing the logging itself). In this case the only way to see those errors is to start the service outside of IIS (in-process) with the dotnet CLI.
- Open up a command prompt as an administrator and navigate to the
%OMETA_INSTALL_ROOT%\Ometa Software Suite\Services\Authority Servicedirectory - Execute the command
dotnet .\Ometa.Framework.Authority.dll
Any errors within the startup sequence will be thrown to the console and can be investigated.
If the command above executes successfully but browsing the service still returns 'HTTP 500.19 Internal Server' error, ensure that the correct .NET Runtime is explicitly installed.
Warning
Installation of the .NET SDK does not install all required modules to host the service on IIS.
Browser fails to challenge (cannot reach this page)
If you have Windows Authentication enabled on the Authority Service and the user is outside your network domain, it can happen that the browser states that the page cannot be reached when the user is forwarded to the Authority Service for authentication.
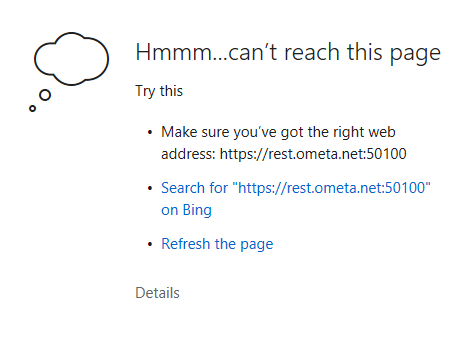
So far, this behavior has only been seen on Edge browsers.
Follow these steps to ensure that the browser tries to prompt the user for credentials rather then ignoring the challenge.
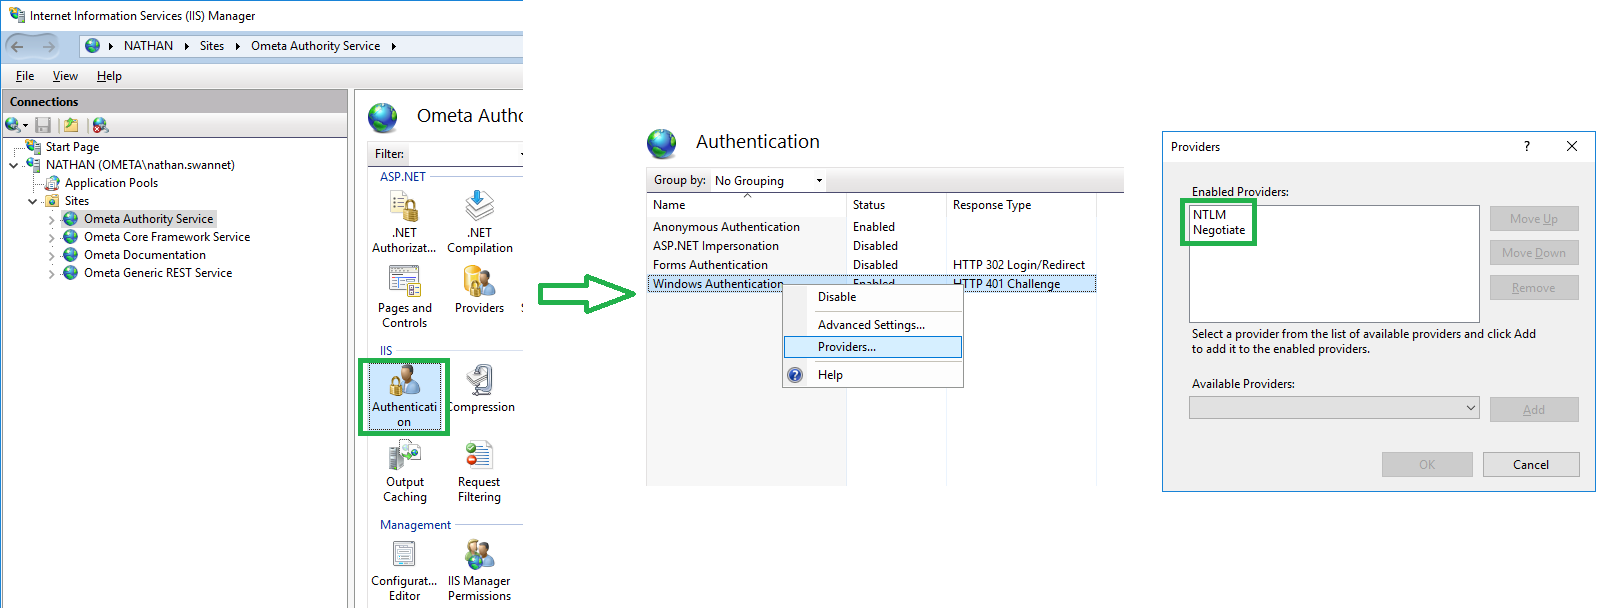
- Go to the
Authenticationsettings of the Authority Service. - Right-click
Windows Authenticationand clickProviders. - Make sure that NTLM takes precedence over Negotiate.
Keyset does not exist
Refer to the troubleshooting of Ometa Business Connector.
IDX10630: The '[PII is hidden]' for signing cannot be smaller than '[PII is hidden]' bits. KeySize: '[PII is hidden]'. Parameter name: key.KeySize
Refer to the troubleshooting of Ometa Business Connector.
Blank Authentication Pop-up in the Business Connector
Refer to the troubleshooting of Authority Service White Screen.