Azure ACS Retirement
Microsoft is retiring the use of Azure ACS (Access Control Services) for SharePoint Online.
Azure ACS will stop working for new tenants on November 1st, 2024 and it will stop working for existing tenants and will be fully retired as of April 2nd, 2026. This applies to all environments.
As a result, Ometa has adopted their authentication layers towards all SharePoint environments (Cloud and on-premise subscriptions) to take into account this retirement.
More information about this retirement can be found here.
Important
The following authentication methods will not work anymore towards SharePoint environments:
- Client Id and Secret
- Azure Key Vault
- For SharePoint Online: email and password
The following authentication methods work:
- For SharePoint Online: Only Azure AD Certificates
- For SharePoint On-premise: Username and password
Authentication Methods
The Ometa framework offers several authentication methods towards SharePoint. Below is an ordered list of the authentication methods that the framework supports. The first method that is configured in the profile will be used.
| Name | Necessary Settings Fields | Where to use? |
|---|---|---|
| Azure AD Certificate |
|
SharePoint Online |
| Username Password |
|
SharePoint On-premise |
Setup
A few steps are needed to configure SharePoint authentication in the framework. You'll need to register an application in the Microsoft Entra portal and configure SharePoint API permissions on it.
Warning
In the following steps, you will be adding an application to Microsoft Entra. Don't do this under your personal account, but use an account of your organisation.
Register the Ometa Framework as a Microsoft Entra Application
Note
This step is optional if you already registered a Microsoft Entra application for authenticating users with the Microsoft provider in the Ometa Framework.
If so, you can extend that application with the required API permissions. However, you can also choose to create a separate Microsoft Entra application for integrating the Ometa Framework with SharePoint.
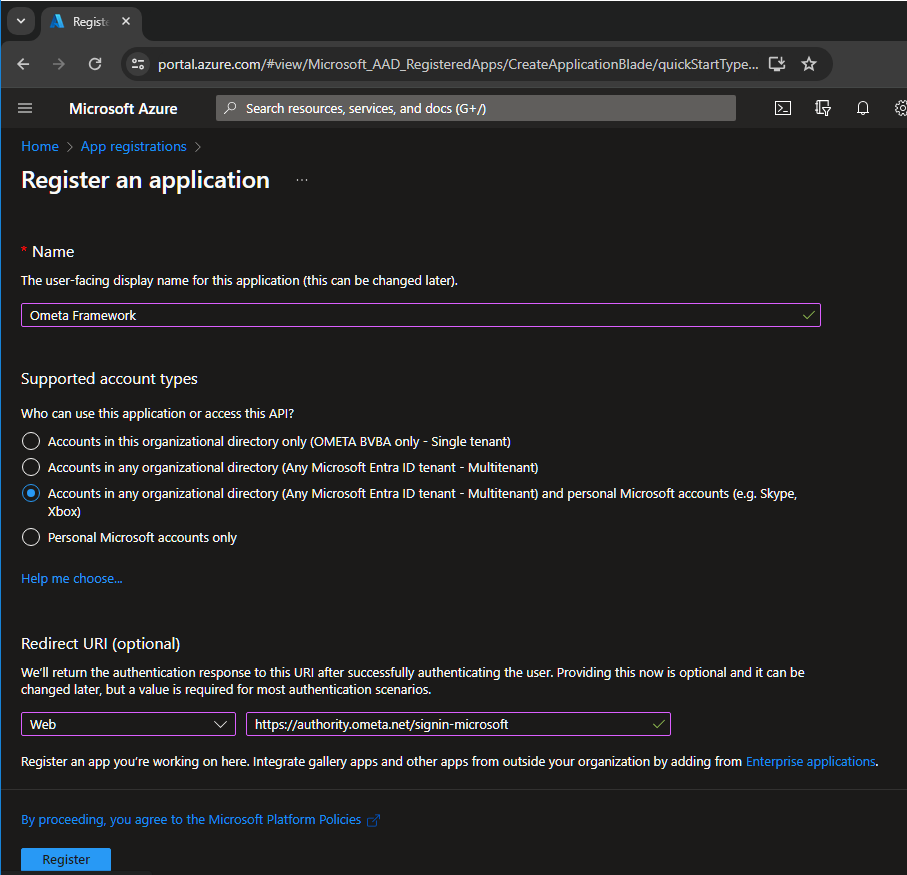
Login to the Microsoft Entra Portal, navigate to the App Registrations and click on New registration.
Fill-in the name which you want to use for this application.
Note
It is a best practice to name this application using your company's name. When the solution is used by external parties, they will need to provide consent via a user consent prompt. The display name for this application will be used in this user consent screen.
Using your company name increases trust and confidence for external users when providing this information. If you have any further questions about how Ometa processes sensitive information, please refer to the GDPR article.Choose which account types will be logging in via this application. When this application will only be used for integrating the Ometa Framework with SharePoint, accounts in this organizational directory only will suffice.
Click on Register.
Configure a Certificate
The Microsoft Entra application has now been registered. The next step is to configure a certificate to establish trust between the Ometa Framework and the Microsoft Entra application. This certificate must be stored on the Ometa server with its private key. The public part of the certificate is uploaded to the Microsoft Entra application.
You can either use:
- Self-Signed Certificates: These are created and signed by you. They are suitable for testing and development but not recommended for production environments due to security concerns.
- Certificate Authority (CA)-Signed Certificates: These are issued by trusted third-party CAs and are recommended for production environments.
Tip
Subject Alternative Name (SAN) is not required for this scenario. The certificate is used as an application credential (client assertion) to Microsoft Entra ID, not for TLS server name validation. Provide a certificate that contains a public/private key pair (RSA 2048+ with SHA-256 recommended). Upload the public certificate (.cer) to the Entra app registration and install the private key (.pfx) on the Ometa server.
Optional Step for Generating a Self-Signed Certificate
Important
Following the advice of Microsoft, we recommend using a CA-signed certificate. However, if using a trusted CA isn't possible, self-signed certificates are still preferred over passwords.
If you don't already have a certificate, a self-signed certificate can be generated using the following steps:
- Ensure that PowerShell version 7 is installed. The version can be checked with the following command:
$PSVersionTable.PSVersion - You need PowerShell 7.2 or later to use PnP PowerShell. It is available for Windows, Linux and Mac and can be installed through here.
- Install-Module PnP.PowerShell -Scope CurrentUser
- https://pnp.github.io/powershell/articles/installation.html
- The following command can be used to generate the certificate, change the password and names accordingly:
Install-Module PnP.PowerShell
Import-Module PnP.PowerShell
New-PnPAzureCertificate -CertificatePassword (ConvertTo-SecureString -String "verySecurePassword" -AsPlainText -Force) -OutCert "c:\temp\ometa.cer" -OutPfx "c:\temp\ometa.pfx" -CommonName "Ometa Certificate" -Organization "Ometa BV" -Country "BE"
More information about PnP PowerShell can be found here.
Using the Certificate
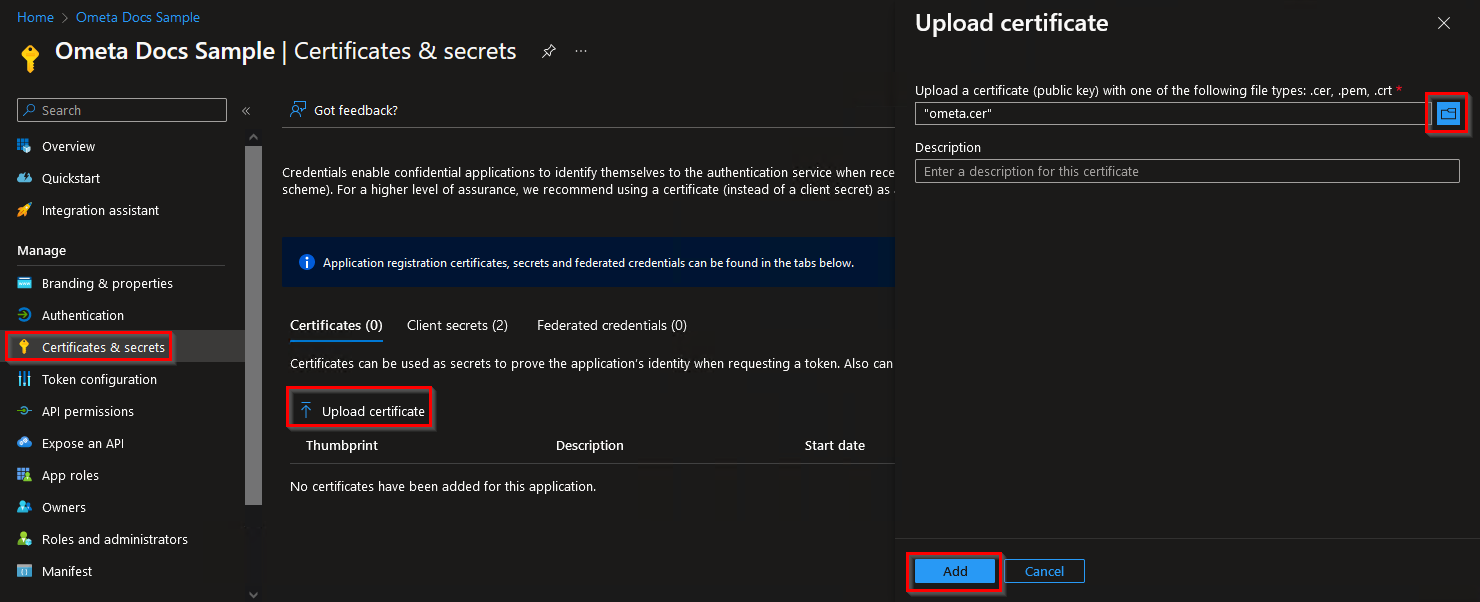
- Import the certificate (.pfx with private key) into the Local Computer > Personal (Certificates) store on the Ometa server so the service can access the private key.
- Upload only the public certificate (.cer) to the Microsoft Entra application in the Certificates & secrets section. Never upload the .pfx (private key) to Entra.
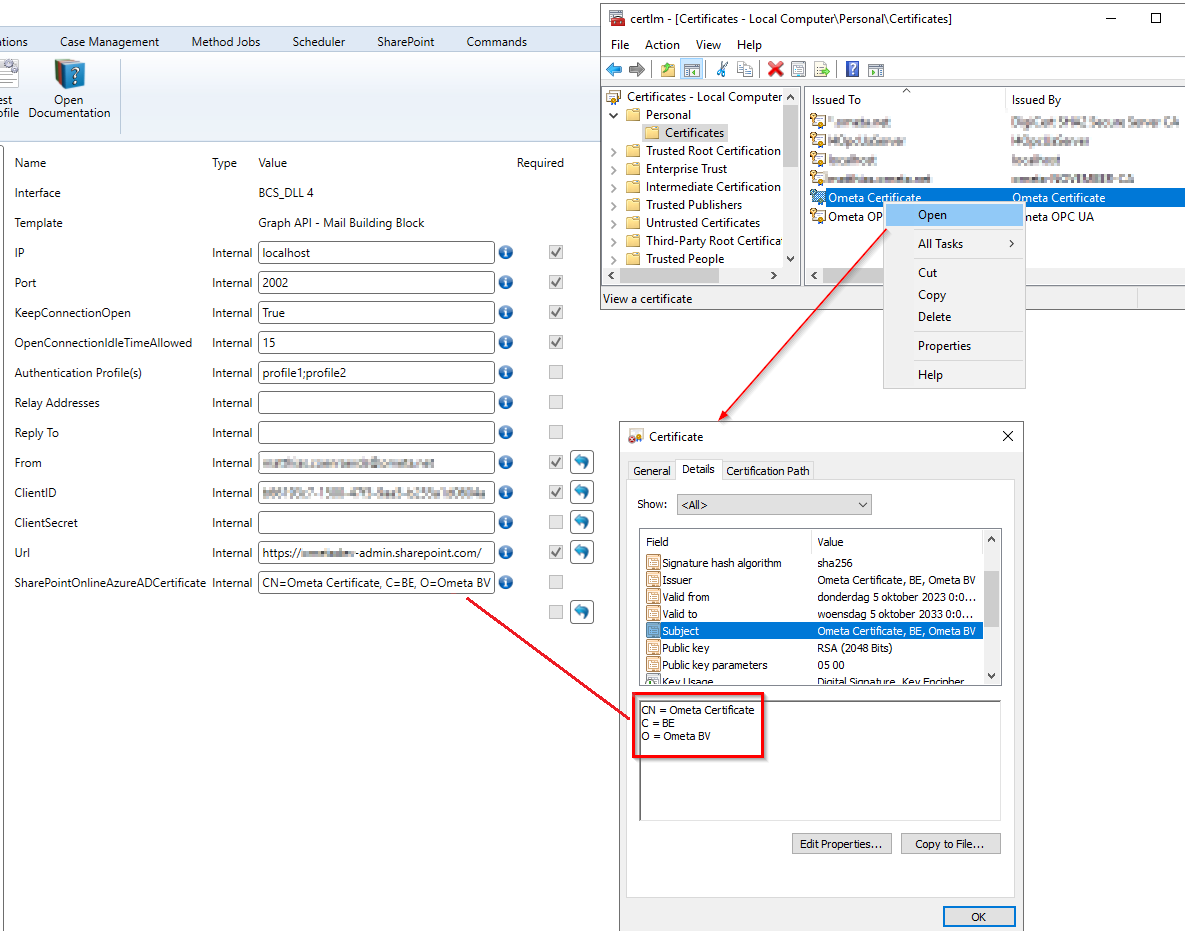
Configure the certificate in the framework.
- For SharePoint / BuildingBlock / Mail BuildingBlocks, these are the
SharePointOnlineAzureADCertificate/Certificate/Certificate PEM PathandSharePointOnlineTenant/ClientID/OAuth Client IDfields in the profiles. The value of the certificate should be the subject name and can be found in the details of the certificate in the Computer Certificates.
Important
The Ometa Framework selects the first certificate it finds in the local computer certificate store with the configured subject name. To ensure the correct certificate is selected, please remove any older (expired) certificates with the same subject name.
Note
Due to migration changes, multiple fields are used to check for the certificate and tenant.
- For the certificate, the fields
SharePointOnlineAzureADCertificate,CertificateandCertificate PEM Pathare checked - For the tenant id or url, the fields
SharePointOnlineTenant,ClientIDandOAuth Client IDare checked. If the value of the fieldClientIDorOAuth Client IDis in the formClientId@TenantIdOrUrl, theSharePointOnlineTenantfield can be left empty.
This profile configuration can also be applied to SharePoint profiles, (Mail) BuildingBlock profiles and OData/REST profiles targeting the Microsoft ecosystem (SharePoint, Graph API, ...).
You're now able to integrate the Ometa Framework with your SharePoint environment if the app has the necessary API permissions to access SharePoint.
Configuration in the Ometa Framework
If you intend to use the same authentication method throughout the framework, check the following configurations:
- Microsoft Provider: configure the Microsoft provider for logging in with the Microsoft account, found in Application Menu > Security > Providers. Requires
Directory.Read.Allapplication andUser.Readdelegated permissions. - Mail Building Block profiles: requires profile configuration and
Mail.Sendapplication permissions. - SharePoint profiles: requires profile configuration and
Sites.FullControl.Allapplication orSites.Selectedapplication permissions. - BuildingBlock profiles: requires profile configuration and
Sites.FullControl.Allapplication orSites.Selectedapplication permissions. - Generic REST:
config.SharePointAuthenticationsmust be configured, see the Service Settings section: requiresSites.FullControl.Allapplication orSites.Selectedapplication permissions.
Granting API Permissions to the Client
Once the Microsoft Entra application is set up, it needs sufficient permissions to invoke the SharePoint calls.
See the list above for which permissions you'll need to configure.
Afterwards the admin consent should be granted.
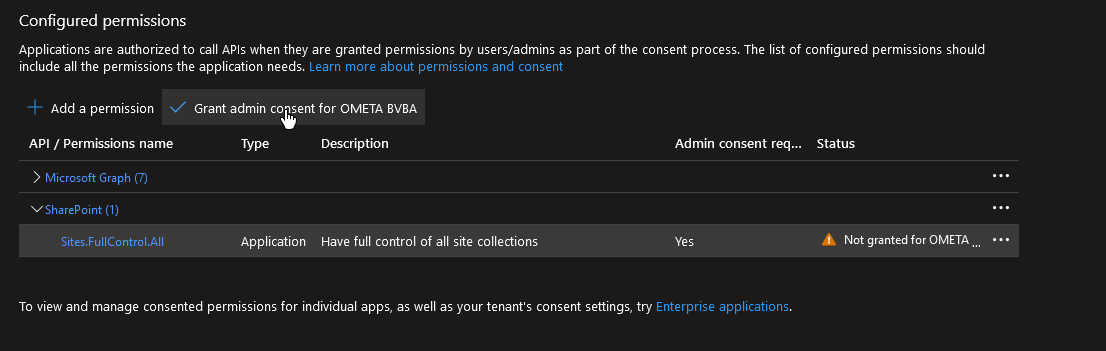
When troubleshooting, you will have to restart the web services for Ometa to fetch a new token with the updated permissions.
Sites.Selected
The Sites.Selected SharePoint API permission in Microsoft Entra allows applications to access specific SharePoint sites with granular control. This is particularly useful for scenarios where you want to limit an application’s access to only certain sites rather than the entire SharePoint environment.
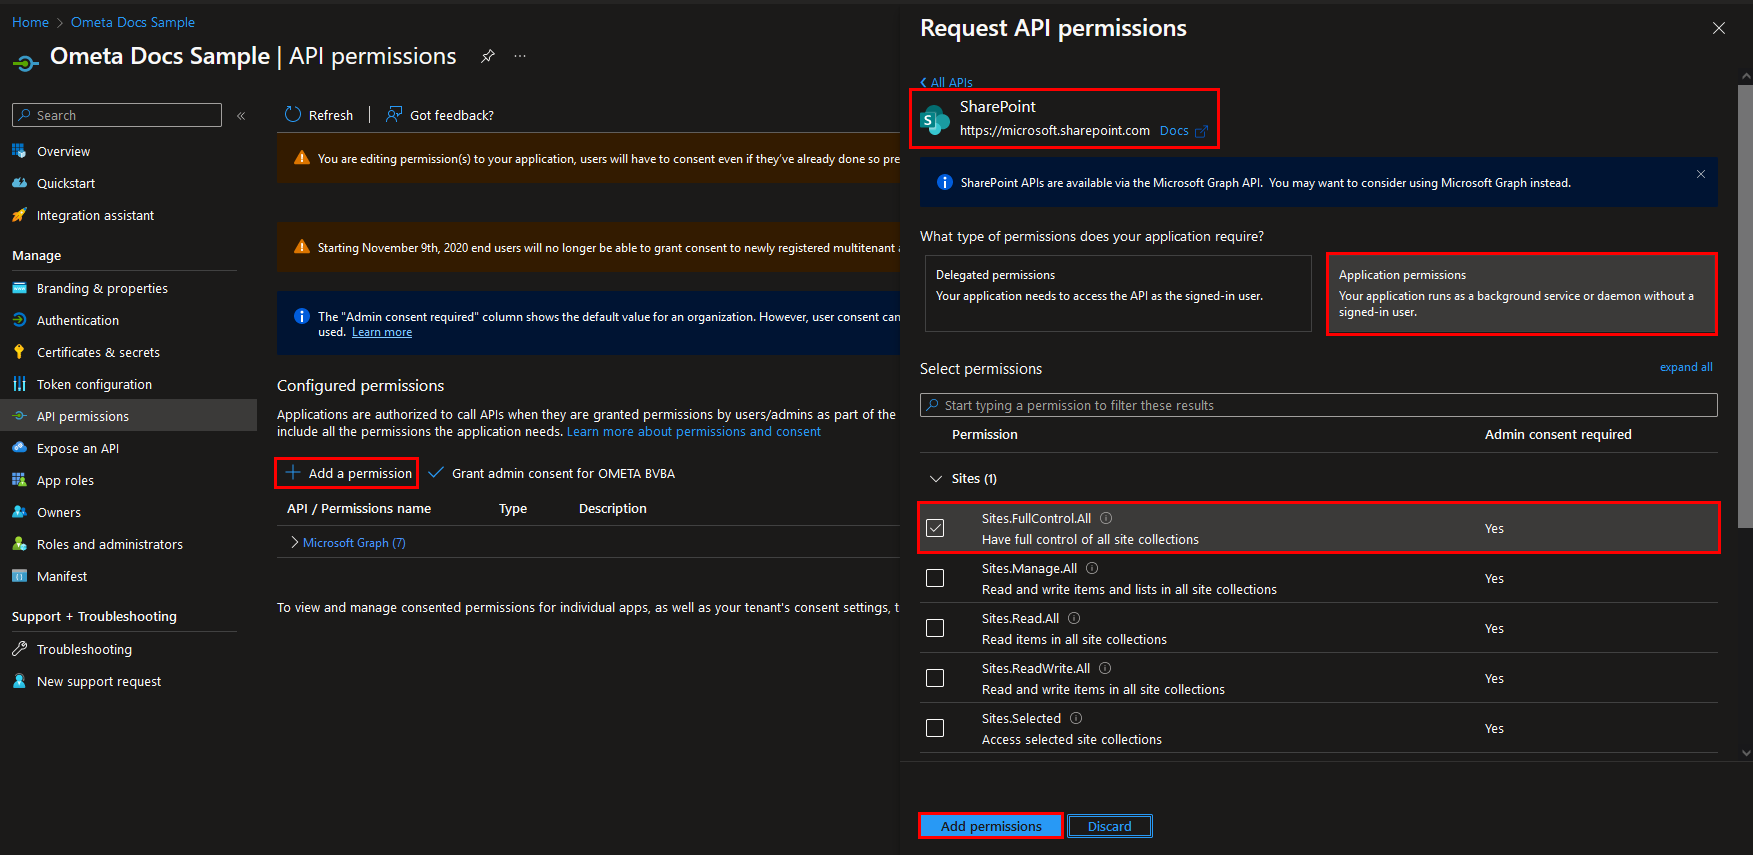
- Go to the application.
- Go to API permissions > Add a permission.
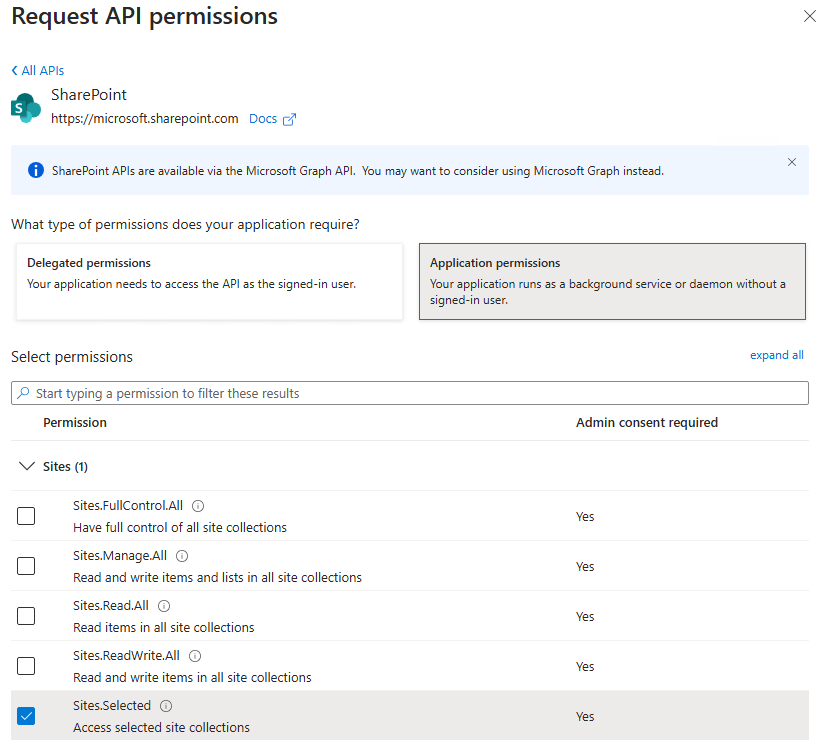
- Choose SharePoint and select Application permissions.
- Search for and select Sites.Selected. This permission allows your app to access specific SharePoint sites.
- Make sure to Grant Admin Consent for the permission to take effect.
At the time of writing, Microsoft does not support linking the Entra Application to the SharePoint site. Perhaps the most easy way to achieve this is by using the Graph API Explorer.
Step 1: Access and Prepare Graph Explorer
Navigate to the Microsoft Graph Explorer.
Sign In: Log in using an account with SharePoint Administrator or Global Administrator privileges.
Consent to Necessary Permissions (for Graph Explorer): To grant permissions to your application using Graph Explorer, your logged-in user needs the ability to manage site permissions via the Graph API.
- Click on the Modify permissions tab (or your profile icon > Consent to permissions in older versions).
- Find and consent to the
Sites.FullControl.All(Delegated) permission. This permission allows Graph Explorer, acting as you, to manage permissions on all sites. - Note: Granting
Sites.FullControl.Allmight require consenting to dependent permissions likeDirectory.Read.All. Graph Explorer will usually prompt you if additional consents are needed. Accept the consent request. - Important: This high level of permission (
Sites.FullControl.All) is for your administrative session in Graph Explorer only to set the permissions. It is not the permission your application will ultimately have. Your application will still be limited bySites.Selectedand the specific site permissions you grant in the next steps.

Step 2: Identify the Target SharePoint Site ID
To grant permissions, you first need the unique ID of the target SharePoint site as recognized by Microsoft Graph.
In Graph Explorer, set the request type to GET.
Enter the following URL, replacing {tenantname} and {sitename} with your actual tenant name and site name:
GET https://graph.microsoft.com/v1.0/sites/{tenantname}.sharepoint.com:/sites/{sitename}Copy the full
idvalue. You will need it in the next step.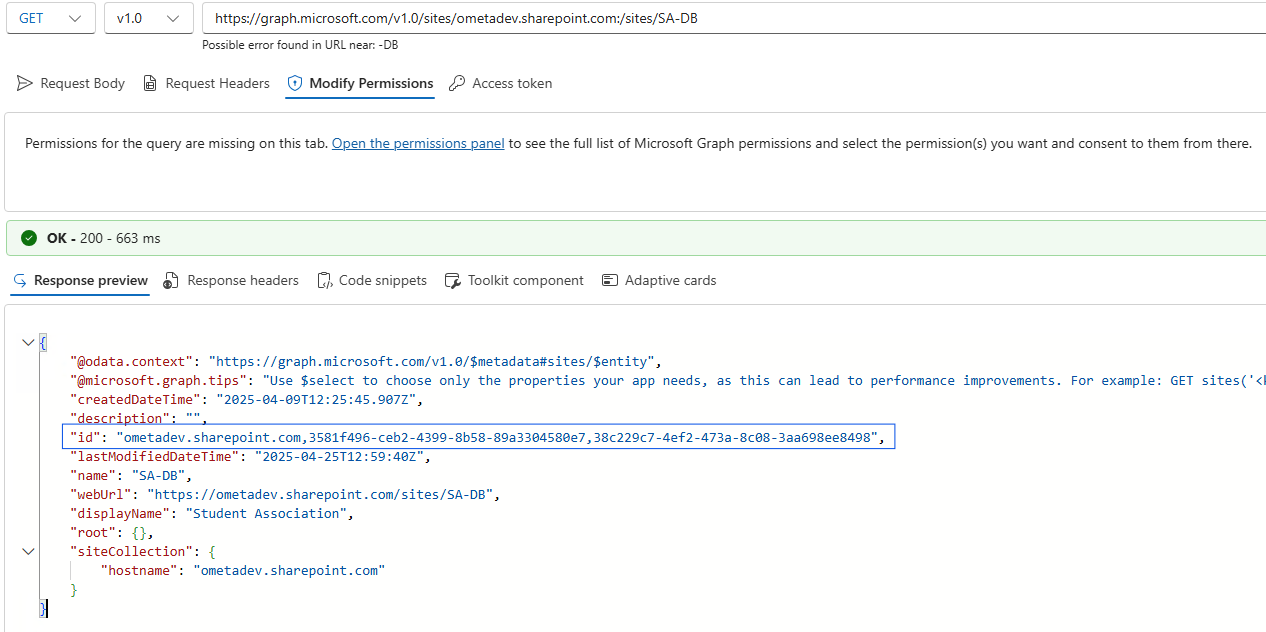
Step 3: Grant Application Permissions to the Site
Now, you will make a POST request to add the permission entry for your application on the specific site.
Change the request type to POST. Replace
{site-id}with the full ID copied from Step 2.POST https://graph.microsoft.com/v1.0/sites/{site-id}/permissionsEnter the following JSON payload in the Request Body.
{
"roles":[
    "fullcontrol"
],
"grantedToIdentities":[
    {
        "application":{
            "id":"Your_App_ID_Here",
            "displayName":"Your_App_Name_Here"
        }
    }
]
}
Make the request. You should see a pair of permissions being created for v1 and v2. You can perform a
GETrequest to check if the permissions are (already) registered.
Filling in the Building Blocks Profile
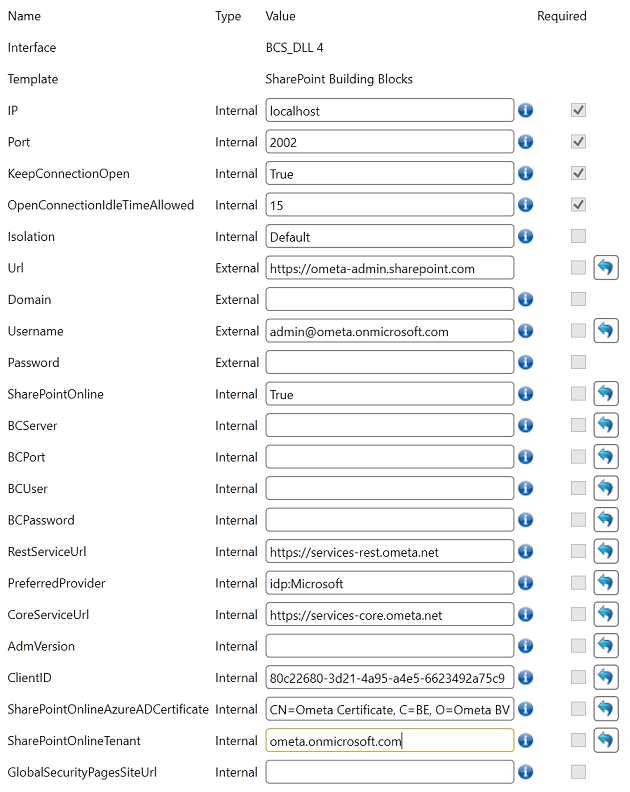
To use App-Only authentication in the Ometa Framework we need to change the profile(s). Fill in the ClientID of the Azure application, the SharePointOnlineAzureADCertificate and the SharePointOnlineTenant.
The Domain and Password fields can be left empty. They are ignored when ClientID and SharePointOnlineAzureADCertificate are set. The Username field can only be left empty if you don't use this profile for site creation.
Warning
If you use this profile for site creation, an owner account must exist in the form of an email address. If the Trigger Case Management setting on the method doesn't contain a custom owner, you need to provide an owner's email address in the Username field of this profile. Otherwise site creation will fail.