Microsoft Entra Provider 
Microsoft Entra fully supports the OAuth 2.0 protocol and can therefore be used as a trusted provider for authenticating users and providing their claims.
Setup
A few steps are needed to get Microsoft working as a provider. You'll need to register the Ometa Framework as an application in the Azure portal of Microsoft.
Tip
You can configure multiple Microsoft provider instances, each linked to a different Azure application. This is useful when you need to authenticate users against different Azure tenants or applications. Each instance requires its own app registration in Azure with its own settings.
Best practice when supporting external users: If you need to authenticate users from other organizations or personal Microsoft accounts, it is strongly recommended to set up a dedicated, minimal app registration for external users — separate from the app registration used for internal users. See Separate App Registration for External Users for the full recommended approach.
Warning
In the following steps, you will be adding the Ometa Framework as an application to Azure. Don't do this under your personal account, but use an account of your organisation in Azure.
Register the Ometa Framework as an Application
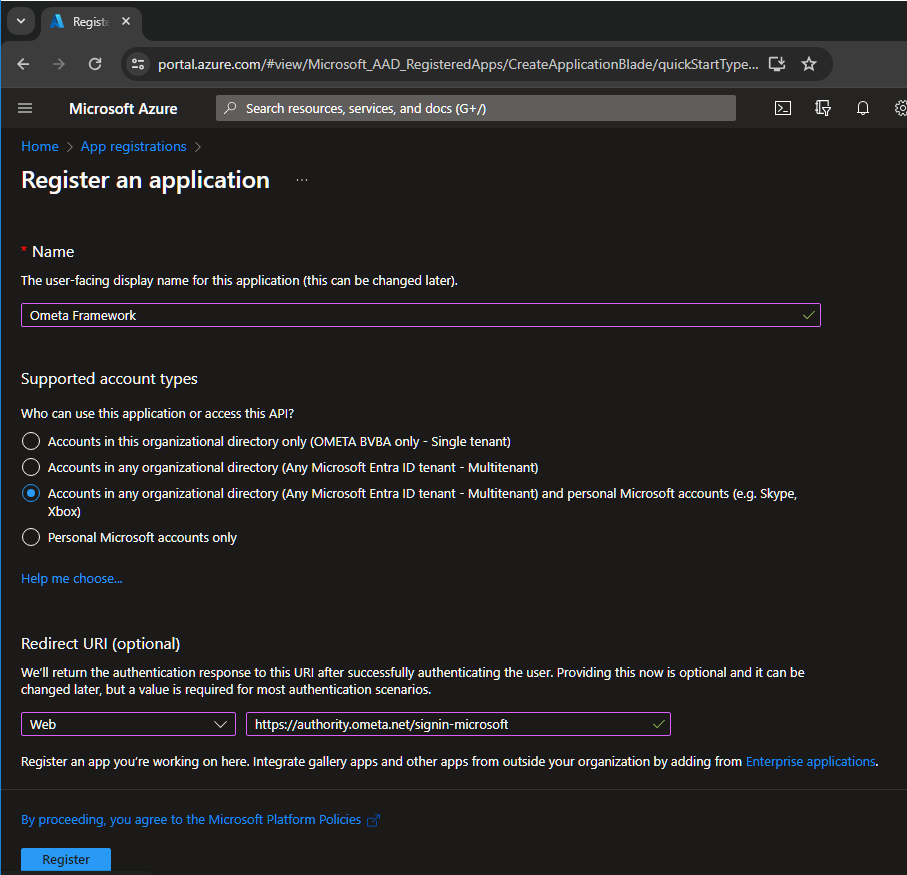
Login to the Microsoft Azure Portal, navigate to the App Registrations and click on New registration.
Fill-in the display name which you want to use for the Ometa Framework.
Note
It is a best practice to name this application using your company's name. When the solution is used by external parties, they will need to provide consent via a user consent prompt. The display name for this application will be used in this user consent screen.
Using your company name increases trust and confidence for external users when providing this information. If you have any further questions about how Ometa processes sensitive information, please refer to the GDPR article.Please refer to the following screenshot for an example of the user consent prompt how an external user sees this:
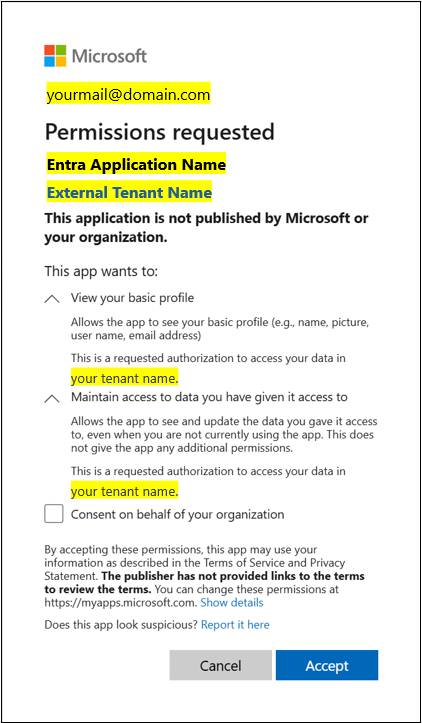
If you don't want to bother external users with the consent screen, you'll have to ask the administrator of the external tenant to configure a trust to your tenant.
Choose which account types will be logging in via this application.
Choose Web as platform and fill in the redirect URI. This must be the url of the Ometa Authority Service appended with /signin-{providerName} where
{providerName}is the name of the provider as configured in the framework (spaces are replaced with hyphens). For example: https://ometa-authority.example.com/signin-microsoft if your provider is named Microsoft.Click on Register.
Use a Certificate or create a secret
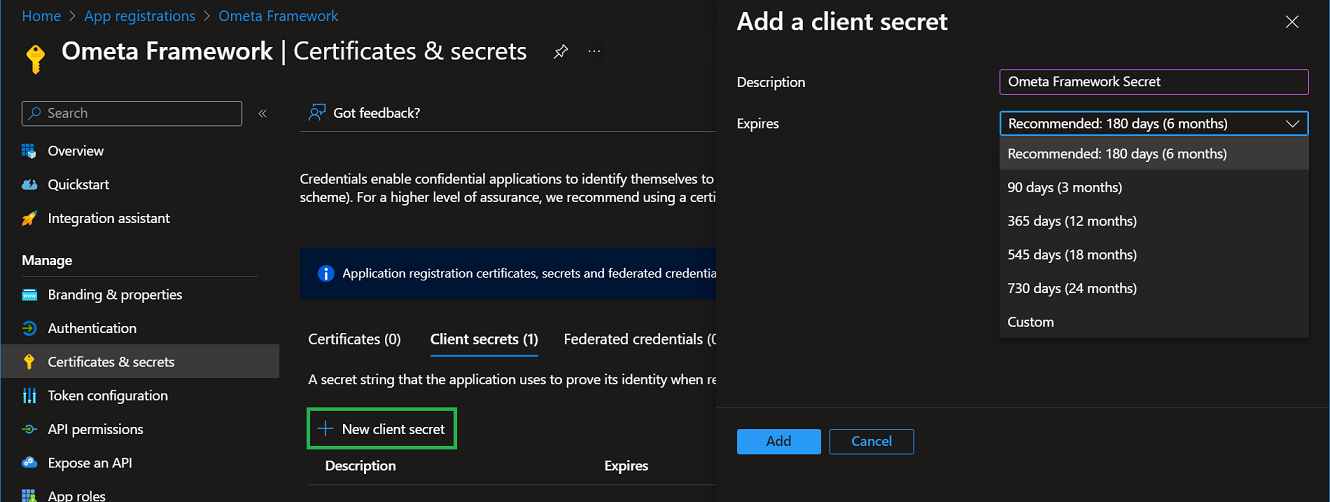
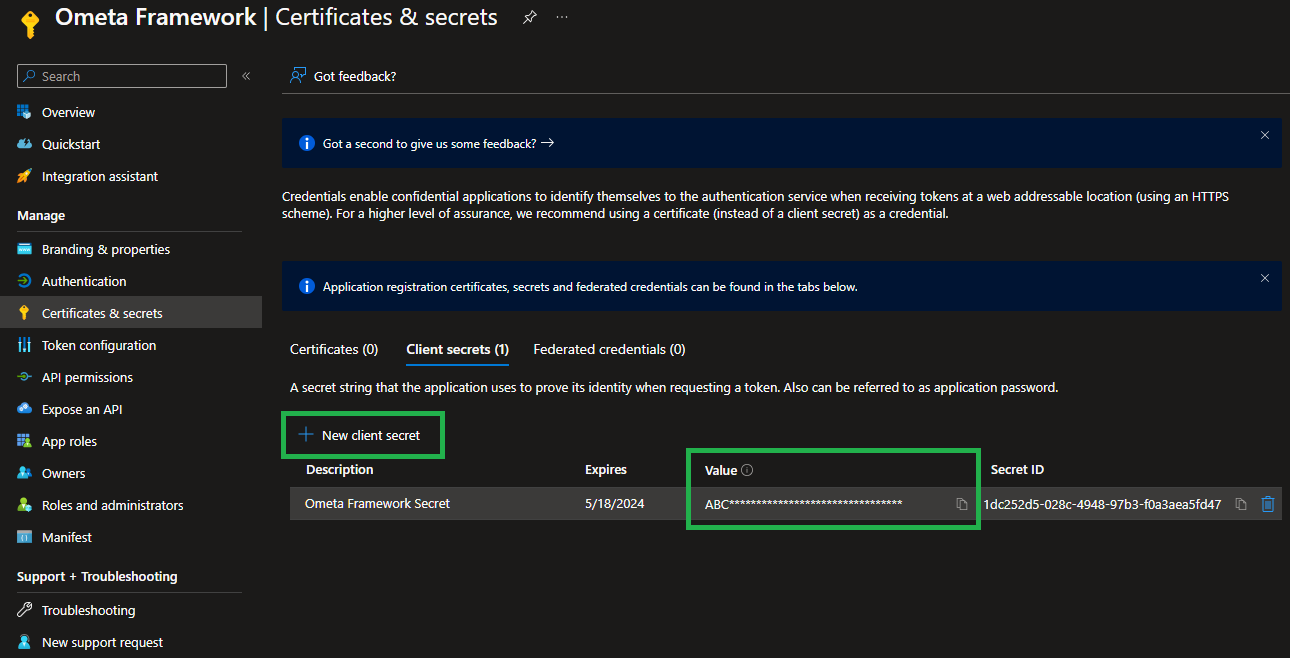
The application has now been registered. The Ometa Authority Service needs a trust relationship with the Microsoft Entra application. This is an extra security check together with a valid redirect uri. You can use a certificate or a secret. A certificate is the recommended way.
- Certificate authentication: This uses a certificate stored on the Ometa server against a certificate (public key) uploaded in the Microsoft Entra application. We recommend this for new installations and production environments as it is more secure.
- Client Secret: This generates a
ClientSecretthat can be used to authenticate a client.
- Click on the Certificates & secrets in the navigation tree on the left of the application registration.
Generating a Self-Signed Certificate
Important
A self-signed certificate should not be used on production environments.
If you don't already have a certificate, a self-signed certificate can be generated using the following steps:
- Ensure that PowerShell version 7 is installed. The version can be checked with the following command:
$PSVersionTable.PSVersion - You need PowerShell 7.2 or later to use PnP PowerShell. It is available for Windows, Linux and Mac and can be installed through here.
- Install-Module PnP.PowerShell -Scope CurrentUser
- https://pnp.github.io/powershell/articles/installation.html
- The following command can be used to generate the certificate, change the password and names accordingly:
Import-Module PnP.PowerShell
New-PnPAzureCertificate -CertificatePassword (ConvertTo-SecureString -String "verySecurePassword" -AsPlainText -Force) -OutCert "c:\temp\ometa.cer" -OutPfx "c:\temp\ometa.pfx" -CommonName "Ometa Certificate" -Organization "Ometa BV" -Country "BE"
More information about PnP PowerShell can be found here.
Using the Certificate
- Import the certificate on the Ometa server under local machine, using the
.pfxfile. - Upload the certificate to the Application in the Azure portal.
- Go to the App Registrations
- Select the application used in the profile (or provider). The
ClientIDof the Ometa configuration should match theApplication (client) IDin the Azure portal. - Upload the certificate in the Certificates & secrets section.

Configure the certificates in the framework.
- For SharePoint / BuildingBlock / Mail BuildingBlocks, this is the
SharePointOnlineAzureADCertificatefield in the profiles. The value should be the subject name and can be found in the details of the certificate in the Computer Certificates.
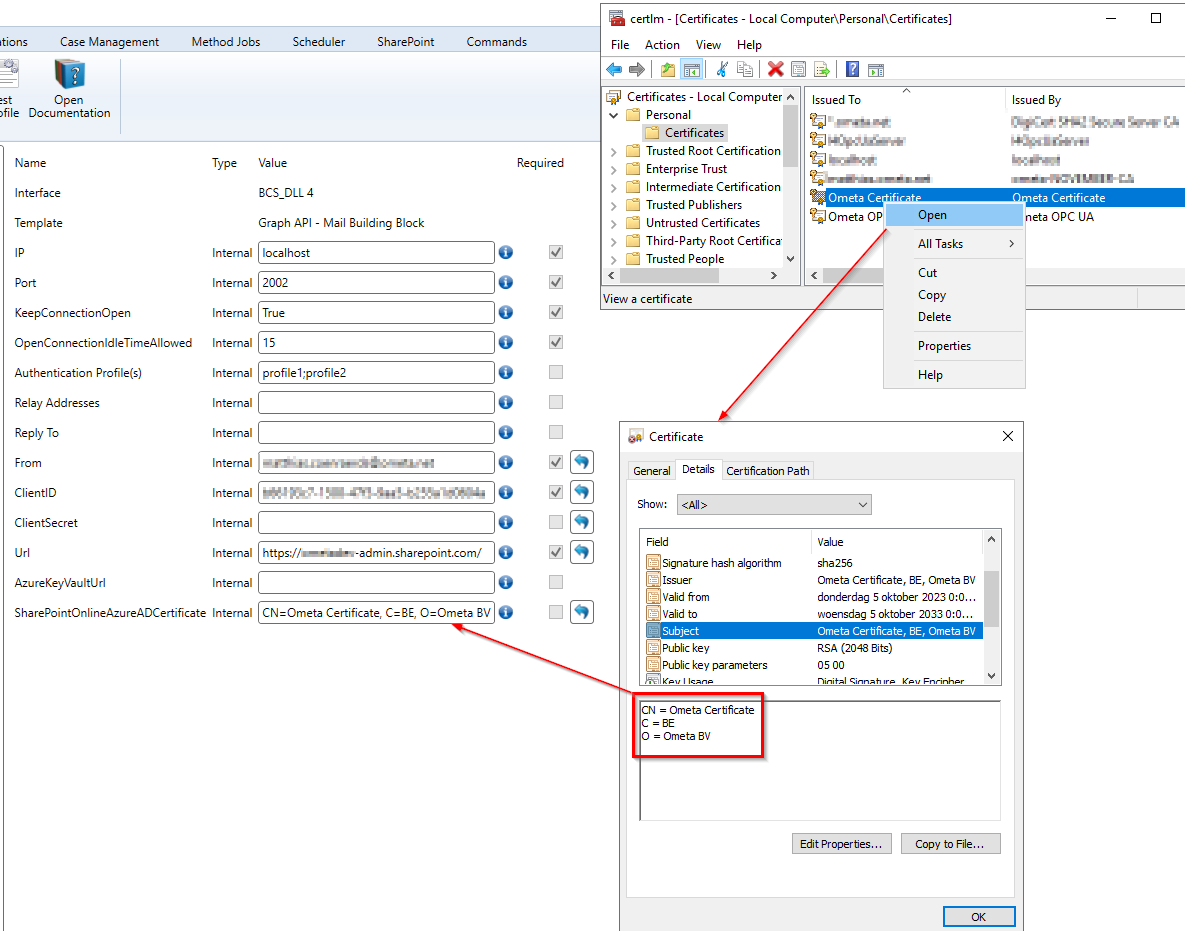
This profile configuration can also be applied to SharePoint profiles, BuildingBlock profiles and any other Mail BuildingBlock profiles. See below for a full list.
- For the Microsoft provider, fill-in the
Certificate Subjectfield.
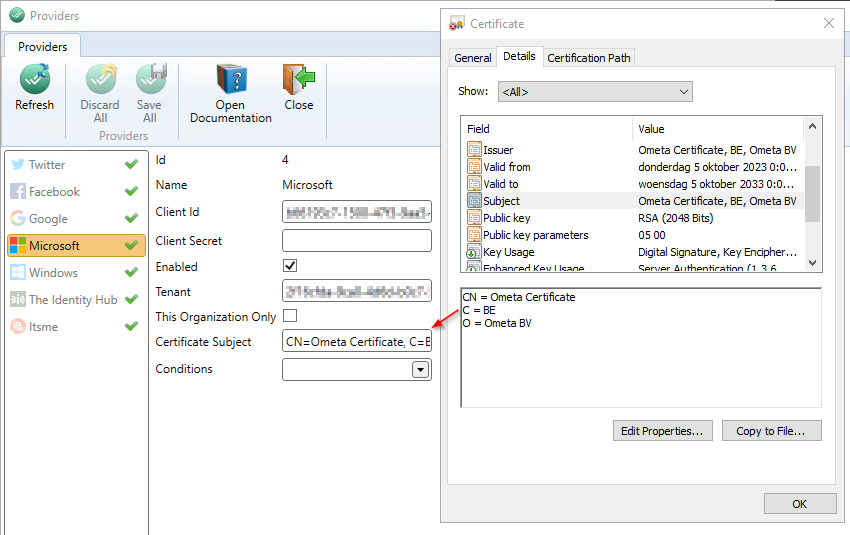
Configuration in the Ometa Framework
If you intend to use the same authentication method throughout the framework, check the following configurations:
- Microsoft Provider: configure the Microsoft provider for logging in with the Microsoft account, found in Application Menu > Security > Providers. Requires
Directory.Read.Allapplication andUser.Readdelegated permissions. - Mail Building Block profiles: requires profile configuration and
Mail.Sendapplication permissions. - SharePoint profiles: requires profile configuration and
Sites.FullControl.Allapplication orSites.Selectedapplication permissions. - BuildingBlock profiles: requires profile configuration and
Sites.FullControl.Allapplication orSites.Selectedapplication permissions. - Generic REST:
config.SharePointAuthenticationsmust be configured, see the Service Settings section: requiresSites.FullControl.Allapplication orSites.Selectedapplication permissions.
API Permissions
By default, only the API permission User.Read is added and is user-consent based. This means that a user, who tries to login, will have to give consent to the Ometa Framework for reading its profile information like their name and e-mail. This consent must be given the very first time a user tries to login with Microsoft via our framework.
Permission Directory.Read.All
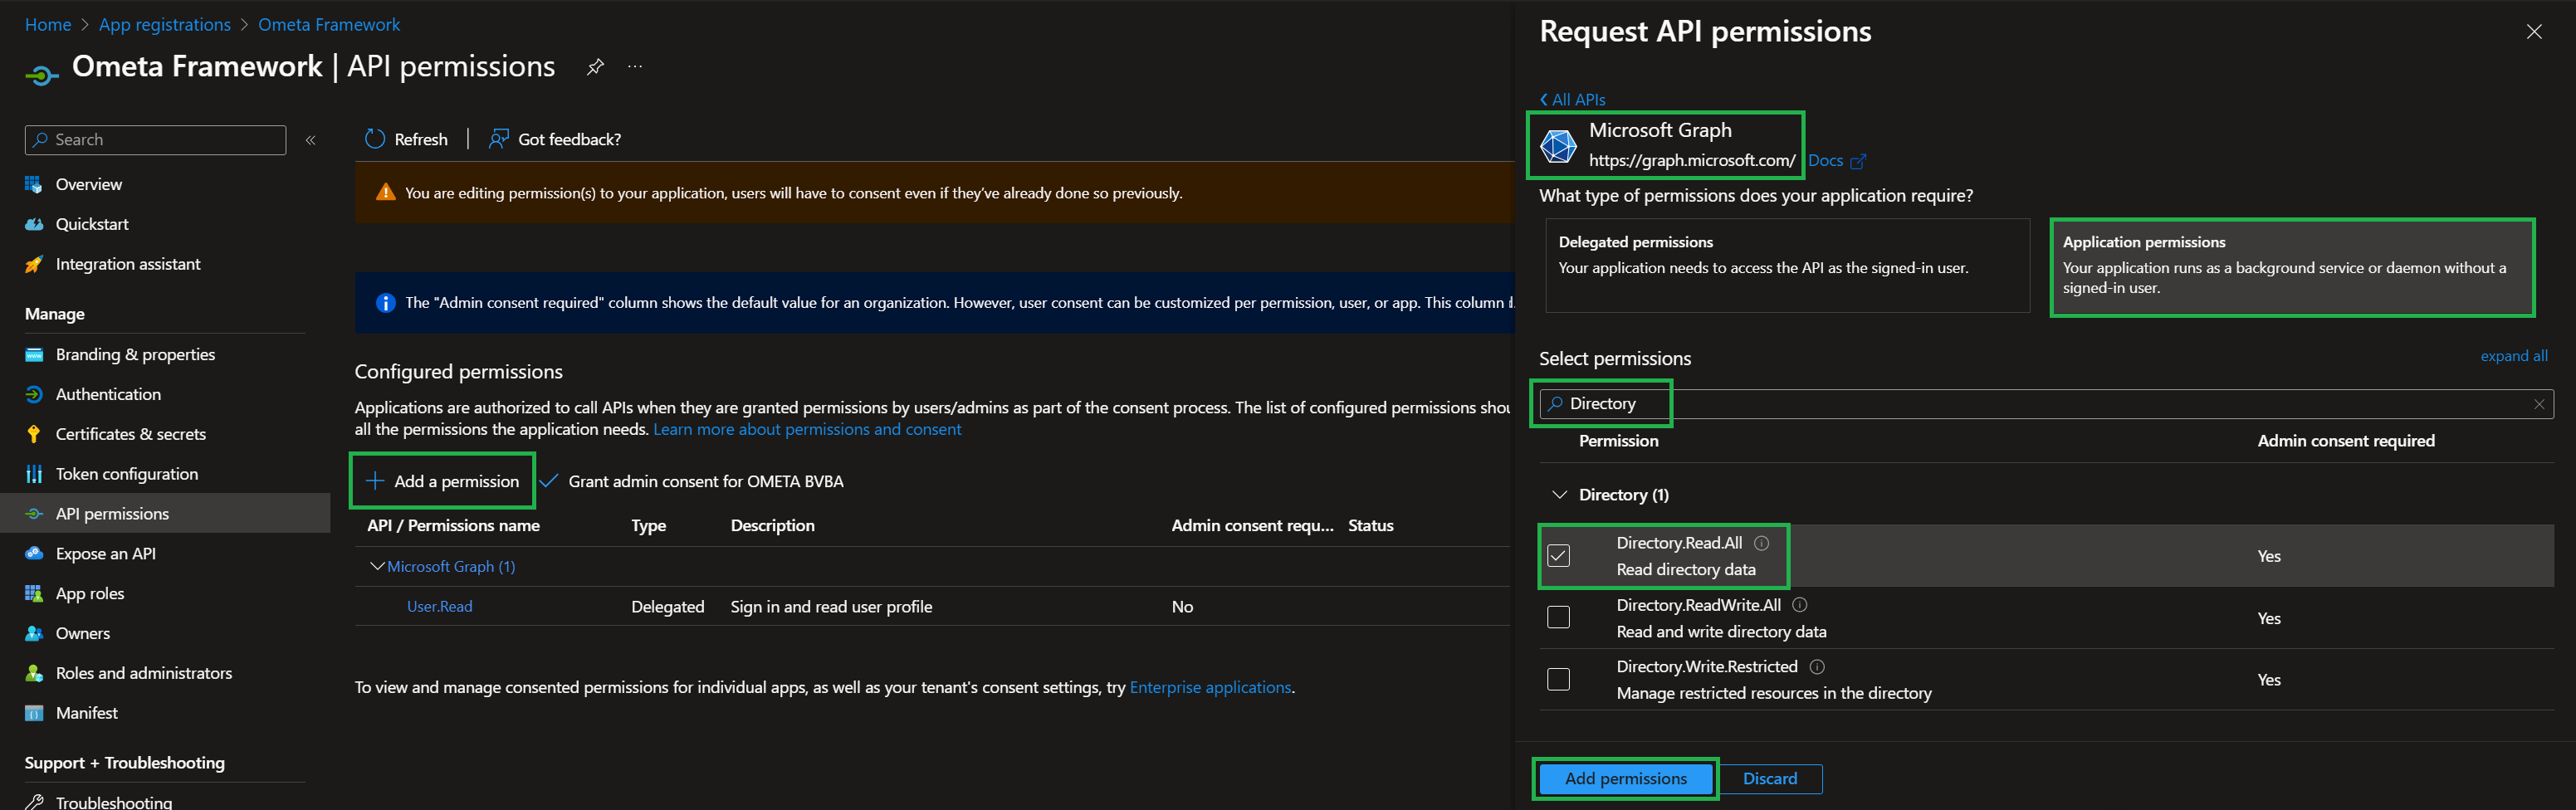
To be able to read the AD group memberships of your users in Azure AD, you'll need to set an extra permission named Directory.Read.All on the application registration. This enables our framework to read and refresh active directory information and group memberships.
- Click on the API permissions in the navigation tree on the left of the application registration
- Click on Add a permission
- Click on the tile Microsoft Graph
- Choose Application permissions as permission type
- Choose Directory.Read.All and click Add permissions
Warning
This permission requires admin consent. This can be configured following the steps below. Failure do to so will disable the functionality regarding security with AD group memberships.
Admin Consent
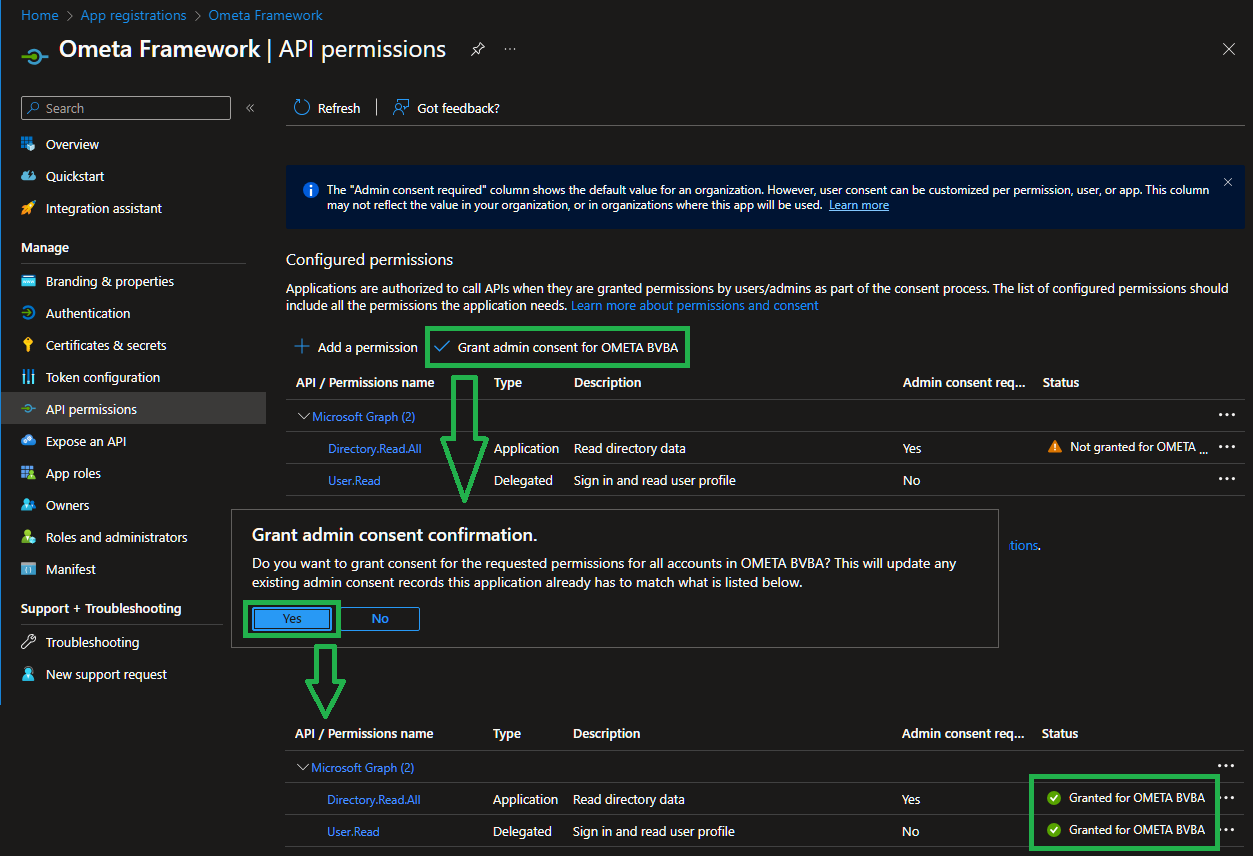
Microsoft has made it possible to bypass the user consent screen for any permissions configured on an application registration. This comes in handy if you don't want to bother your users with the consent screen the first time they login to the Ometa Framework with their Microsoft account. An admin consent for Directory.Read.All is always required if you want to fetch the ad group memberships of signed-in users.
- Click on the API permissions in the navigation tree on the left of the application registration
- Click on Grant admin consent for your organization and confirm your choice
You'll see that the User.Read and the Directory.Read.All permissions are now consented by an admin.
Note
Bypassing the consent screen is only possible for users within your organization. Users from other organizations or with a personal microsoft account will still have to give consent the very first time they try to logon if no trust is configured between your tenant and the tenant of the guest user.
Read this section to learn more about trust between tenants and how to configure it.
Separate App Registration for External Users
When your Ometa Framework installation needs to authenticate users from other organizations or personal Microsoft accounts, it is strongly recommended to use a dedicated, minimal app registration for external authentication — separate from the app registration used for internal users.
Why a Separate Registration?
Internal users typically require elevated API permissions such as:
Directory.Read.All— to read AD group membershipsSites.ReadWrite.AllorSites.Selected(delegated) — to support the Documents ADM OBO flowMail.Send— for mail building blocks- Other application-level permissions for SharePoint and building block profiles
These permissions require admin consent and are appropriate for users within your own organization. However, when an external user attempts to authenticate using the same app registration:
- They are presented with a consent screen requesting all configured permissions
- Their tenant administrator is very unlikely to grant admin consent for high-privilege permissions like
Directory.Read.Allto an external organization - Authentication will fail or result in a degraded user experience
Recommended Setup
| Internal Users App | External Users App | |
|---|---|---|
| Supported accounts | Accounts in this organization only | Any organization or personal accounts |
| API permissions | User.Read (delegated) + Directory.Read.All (application) + other required permissions |
User.Read (delegated) only |
| Admin consent | Required for Directory.Read.All |
Not required |
| Documents ADM OBO flow | Supported | Not supported |
| Provider: This Organization Only | Enabled | Disabled |
Configure both as separate Microsoft provider instances in the Ometa Framework. The TIP above explains how to configure multiple provider instances.
Note
The Documents ADM OBO flow requires Sites.ReadWrite.All or Sites.Selected as a delegated permission and must use the same app registration as the Microsoft provider authenticating the user.
This means the Documents ADM is only available to users authenticated through the internal app registration.
Warning
Do not add elevated permissions such as Directory.Read.All or Sites.ReadWrite.All to the external users app registration.
Doing so will require external tenant admins to grant consent for these high-privilege permissions, which they will typically refuse — causing authentication failures for external users.
Automatic Provider Routing with Conditions
When both providers are enabled simultaneously, the framework will present users with a provider selection screen. To avoid this and route users to the correct provider automatically, configure conditions on each provider instance.
Conditions are evaluated against each incoming authentication request. When only a single provider's conditions are satisfied, the user is forwarded to that provider immediately — without ever seeing a choice screen. See the Conditions tab in the framework provider configuration for the full list of available fields and how to configure condition sets.
The two most practical routing strategies for this scenario are:
IP Address Range (recommended for internal users)
Internal users typically connect from a known IP range (corporate network, VPN). Use Request.IpAddressV4 or Request.IpAddressV6 conditions on the internal provider to match that range.
The external provider requires no IP condition, so it acts as the fallback for all other origins.
| Provider | Condition |
|---|---|
| Internal (Microsoft — Org) | Request.IpAddressV4 starts with 10.0. (adjust to your range) |
| External (Microsoft — External) | (no condition — available to everyone else) |
Tip
If your internal users connect through a VPN, make sure the VPN exit IP is included in the condition range.
Referer URL
If your Ometa Framework is accessible via different host names or entry URLs for internal and external users (e.g., ometa.internal.example.com vs ometa.example.com), use Request.Referer or Request.Host conditions to distinguish them.
| Provider | Condition |
|---|---|
| Internal (Microsoft — Org) | Request.Referer contains ometa.internal.example.com |
| External (Microsoft — External) | Request.Referer contains ometa.example.com |
Note
The available condition field values for a specific request can be inspected in the Authority Service logs at the Information log level. This is useful for validating your condition setup before going live.
Claims
The following claims are provided by Microsoft when a user successfully authenticates itself.
- objectidentifier
- nameidentifier
- tenantid
- name
- givenname
- surname
- emailaddress
- adgroup (zero, one or multiple times depending on the memberships of the user)
An example:
| Type | Value |
|---|---|
| objectidentifier | 7dd7d026-146d-42e0-8f24-49cedcdf1b38 |
| nameidentifier | 58ce8d03-5a68-4695-904a-2f6975Ba7164 |
| tenantid | ffe74249-a2ee-4a6d-943f-353aa2bdf90c |
| name | John Doe |
| givenname | John |
| surname | Doe |
| emailaddress | john.doe@ometa.net |
| adgroup | Developers |
| adgroup | External |
| adgroup | General |
Important
- The objectidentifier claim contains a unique id identifying your user tenant and application wide. This id will never change on the microsoft identity platform.
- The nameidentifier claim uniquely identifies your user within the application registration. Do not use this id to match a user with other application registrations.
User Consent
Note
This information only applies if you didn't consent as an administrator for all users within your organization or the user, who tries to login, is not part of your organization. If the user is not part of your organization (a guest user), it is possible to bypass the consent screen by asking the administrator of the external tenant to configure a trust with your tenant (you should do the same in your tenant for the external tenant). Follow these steps if you want to achieve this.
The first time a user will use the Microsoft login to authenticate themself for using the Ometa Framework, they will need to give consent to the Ometa Framework for receiving information like their e-mail address and name.
Note
If the user doesn't give consent, he/she will not be able to use the Ometa Framework.
The consent must be given only once.
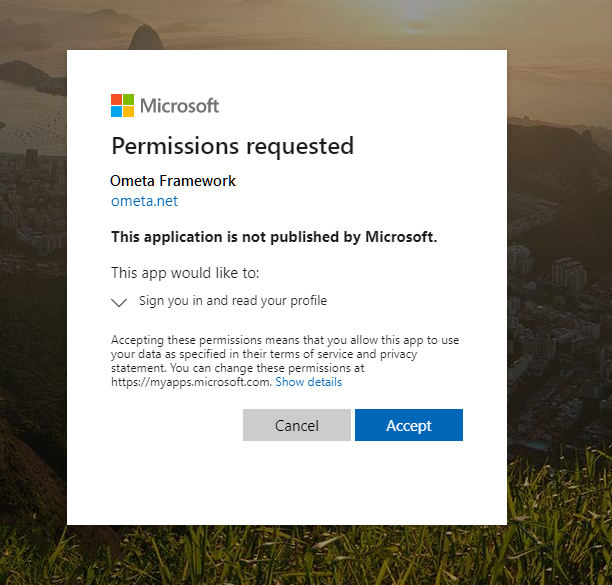
Consent for External Users
It is not possible to authenticate an external user via Azure without asking for consent. Even if you only want some basic information like its name and email. However, if the user is part of an organization (tenant), the administrator of that organization can consent on behalf of all its users by configuring a trust between your tenant and the tenant of that organization. You, as a tenant admin, should also configure a trust to the tenant of that organization. This way, any new invites for external users of that organization will automatically be accepted and the end user will never have to consent for their basic information to be shared with your tenant.
Note
If a trust between your tenant and the tenant of the external organization is not possible, the guest user will always have to consent for its basic information to be shared with your tenant the first time they are asked to login.
Configuring Trust Between Tenants
The only way to not bother your guests with a consent screen is to establish trust between your tenant and the tenant of the guest user. You, as the tenant admin, should configure trust to the external tenant and an admin of the external tenant will also have to configure trust with your tenant.
Important
The external tenant needs Microsoft Entra ID Premium (included in Microsoft 365 E3 for business) to be able to configure this trust.
Important
This configuration needs to be done on your own tenant.
- On Azure, navigate to External Identities -> Cross-tenant access settings and click on the tab Organizational settings
- Click on Add organization
- Fill-in the external tenant id or its domain name (e.g.: external-company.onmicrosoft.com) and click on Add

- The organization will showup in the list of organizations. Click on the link Inherited from default on Inbound access

- Click on the tab Trust settings, enable Automatically redeem invitations with the tenant and click Save


That's it. Guests invited from that external tenant will now be able to login to your tenant without giving consent.
Troubleshooting
Need Admin Approval
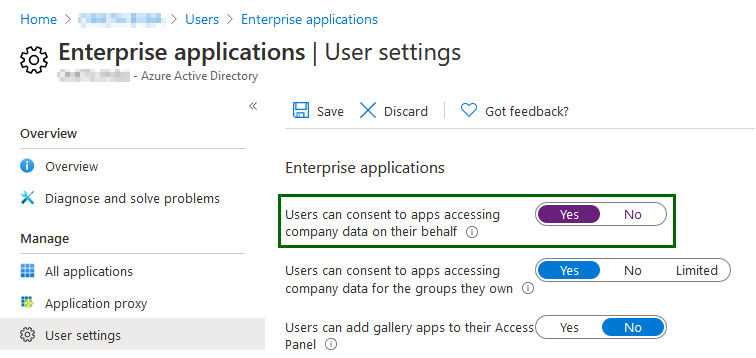
If you get the Need admin approval popup, your IT administrator can either:
- Allow users to consent applications themselves in the Azure user settings.
- Grant admin consent themselves to the Ometa Framework application.
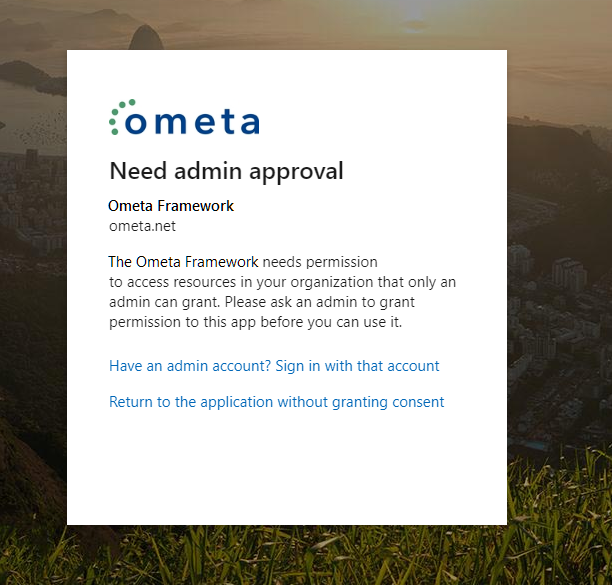
The IT administrator can revoke the access at any time by going to the app registration in Azure.
Warning
If the admin approval is requested for a guest user from another tenant, you probably disabled This Organization Only on your Microsoft provider.
If you do this, all scopes, defined on your Azure application, will be requested for the external tenant. The chance that an admin of that tenant will approve that is as good as zero. Enable This Organization Only, restart your Authority Service and let the guest user try to login again.